Computer technology has been through various upgrades since its launch. Every time we see a new advancement in technology, it always amazes us, users.
The copy and paste are functionalities that made the computer so useful that you can copy and paste anything during your work and save lots of time typing the same thing again.
how to copy and paste on mac
The Mac computer also has the copy and paste method that you can use to copy text from one file to another file without needing to put effort into writing the whole content again.
Here is the guide that will help you to copy and paste the text into your Mac computer.
How to copy and paste on mac?
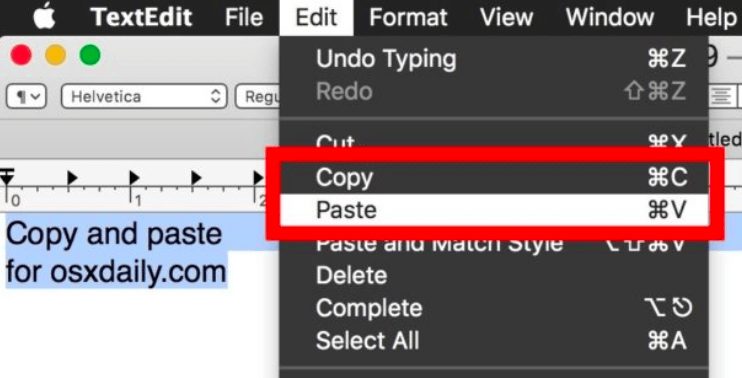
1) Select the text that you want to copy from the file. To do that, choose edit > Copy from the top menu bar. Or use short cut button Command and C.
Copy on mac
This method will copy the selected text and preserve it in the background until you paste it into another file.
Remember that before you take action, you should select the text first, else the file will remain unselected, and when you try to copy the text, it will not move as expected in the copy and paste method.
2) If you want to remove the text from the exiting location, you should use the Command for edit > Cut instead to move the reader from one file to another file.
3) Now go to the file where you want to paste the selected text. Next, choose Edit > Paste or press Command – V on the keyboard.
Paste on mac
4) If you want to match the text’s style to the old document, then post the text in another file, Edit > Paste, and select Match Style to apply the same technique.
Using the above method, you can comfortably copy and paste objects like shapes, text, boxes, and images from one file to another.
How to copy and paste an image on Mac?
Windows users may be familiar with the features used to copy the picture from one file to another.
Mac computer system has similar functionality. Instead of the Control button, the Mac computer clicks the Command button with the X. Use the “C” and “V” buttons to cut and paste the photo.
Drag and drop feature also available on the Mac computer, which makes copying the picture from one file to another super easy. Drag the photo to the page, and it will be copied.
Another way of copping the photo is to select the picture or highlight it. Then press Command + c to copy and Command + v to paste the file wherever you want.
Moreover, the Mac computer also has the right-click option on the picture where you can select the copy button and use it to paste the image to another file.
how to copy and paste on mac
You can see many ways you can copy and paste the image without needing any third-party tool. Image quality will be preserved while copying it from one file to another, so you don’t have to worry about the final output.
How to copy and paste a picture on Mac from the internet?
There will be a situation where you are working on some projects, and now you need new images to add to the project file to make it look useful. Instead of uploading an image from the local computer, you may like to get the required images from the internet.
In this case, downloading photos from the web would be the easiest solution. But the problem with the photos is that it may take time to download and upload them to your document on the Mac computer.
how to copy and paste on mac
Therefore, the Mac operating system has come up with brilliant concepts that would save you time working on a live project.
There are several ways you can copy and paste the image from the internet and add them directly to your working file. One option is to click and hold the cursor on the image you have accessed on the web.
Drag the image straight to your desktop window. It will automatically download the image on your desktop computer. You will have the image download from the web in a few seconds, which you can upload to your project file.
Open your word document and go to the insert image section. It will open the new window. Select the image that you want to insert into your document.
The file will be added immediately, and now you can optimize it as per your need. You can resize it, crop it, and rearrange it in your document to meet the file’s purpose.
how to copy and paste on mac
Difference between windows and Mac copy methods
Both the operating system has many similarities in the functionality. You will find most of the processes you follow on windows are the same on the Mac computer.
The Mac OS developer has preserved the old methods’ aesthetic to avoid any confusion in the users when they shift from the windows to the Apple Mac computer.
One of the computer system’s core features, copied and paste files, is similar in both the computer system. However, the buttons may name differently, but the output it generates is the same.
No significant changes will notice in the Mac computer. We would say both the operating system has made the win-win situation for the computer users. Anyone can easily change their computer system from windows to Mac without needing training.
how to copy and paste on mac
Conclusion:
Use the given method whenever you get stuck in copying the text or the image from one file to another. Mac seems challenging to use when you newly shifted from windows to a Mac computer.
Still, as you continue using it, you will experience the Mac computer system has easy functionality compared to the window.
how to copy and paste on mac
Many shortcuts function through the Command button. Read the manual of the Mac computer if you want to learn more shortcuts to increase your speed. Once you know essential shortcuts, you will be able to operate your laptop like pro users.
The productivity of the user goes up, and many standard solutions are listed in the manual. So every Mac user should learn the necessary shortcuts to use the Mac computer effectively.
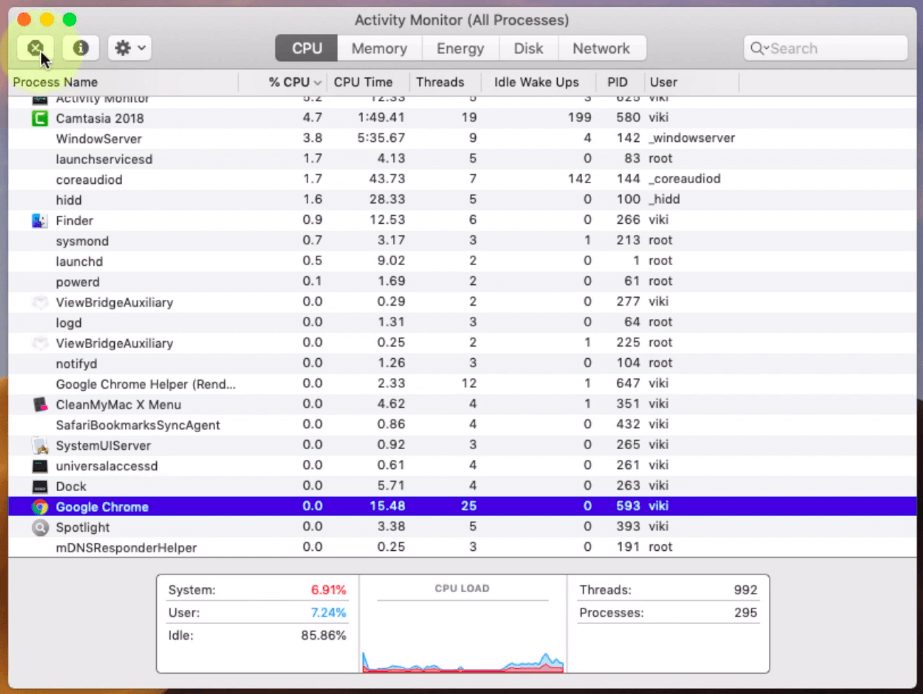
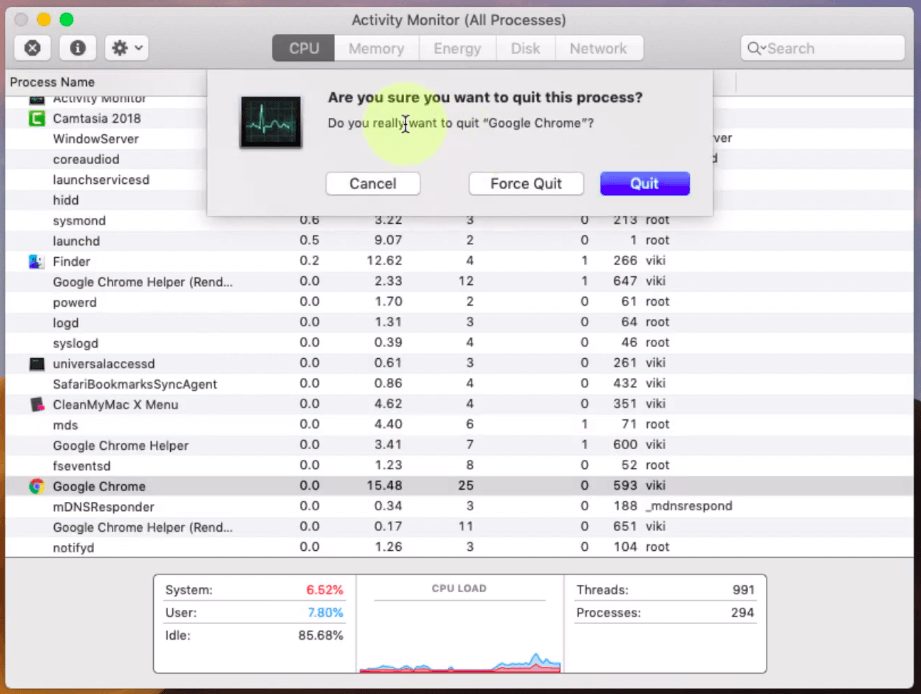
The task manager on the Mac is part of the activity monitor on the Apple Mac computer. Simply press down the [CMD] + [ALT] + [ESC] keys to open the Activity Monitor window. The open window will have a list of currently active programs.
Some will be the current application that you have access to your computer, and others will be part of the background process that requires you to keep your laptop fully functional.
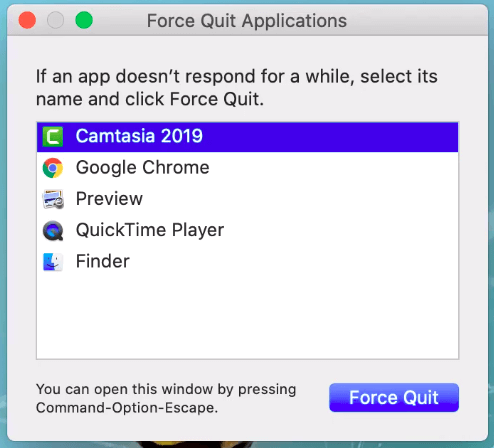
The frozen application is located at the top of the page. Choose the application and click on the “Force Quit” option to close the application.
When you shift from Windows to the Apple Mac book computer, the one thing that you miss the most is the task manager.
It is one of the essential features of the windows computer that has saved people from trouble. The task manager in the windows PC provides a superpower to the computer user.
Close unwanted windows, reduce the memory usage, detects malware running in the background, and most importantly, clean the memory to assign more operating power to the current job. These are some of the tasks that you can handle using the task manager.
But as you shift to the Mac, the first question arises how to open the task manager. As you know the mac computers are the complete opposite of the windows computer. You must use the manual to understand what features are available and what is restricted to the average users.
Task manager on the Apple Mac computer performs a similar task. It will enable you to close the programs that are frozen without affecting the other operations. Additionally, the task manager located on the Mac computer has more advanced features.
The system also offers details about the computer problem. You can view these details by visiting the Mac Activity Monitor.
Managing the new application becomes comfortable with this program. Check the CPU statistics, Memory load, and energy use to understand your computer’s power consumption.
Task manager in Mac Usage
The task manager in Mac offers a wide range of services. Some features are similar to the Windows computer; however, you can do much more with the Mac task manager application.
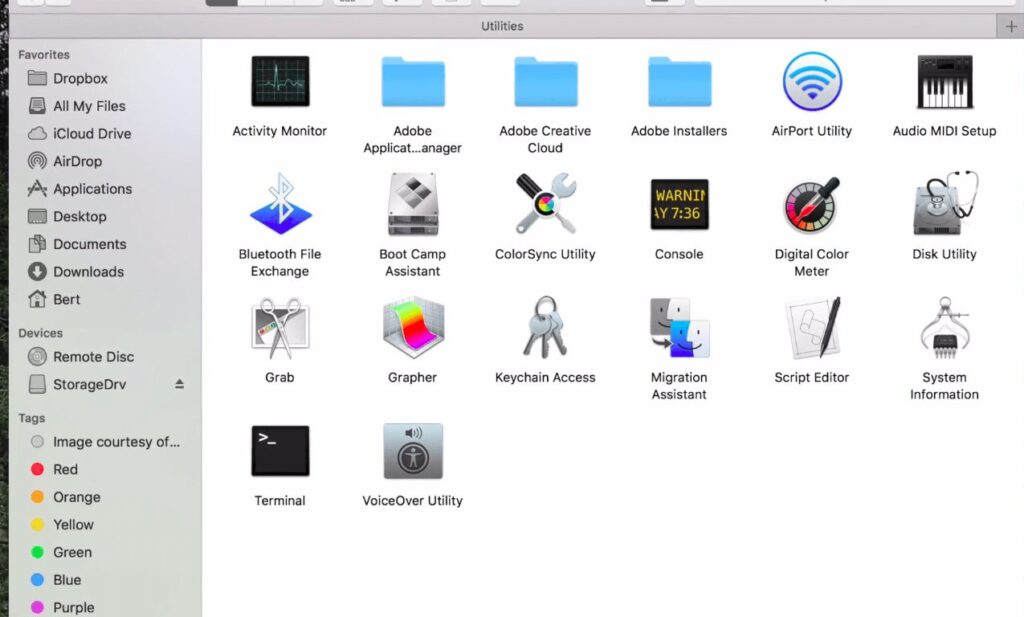
The task manager on the Mac is named “Activity Monitor.” You can find the feature in your application folder under the Utilities.
Another way of searching is to use the search box located on the top. Type Activity monitor to reach the application page. Double click the application icon, and it will open the Activity Monitor window.
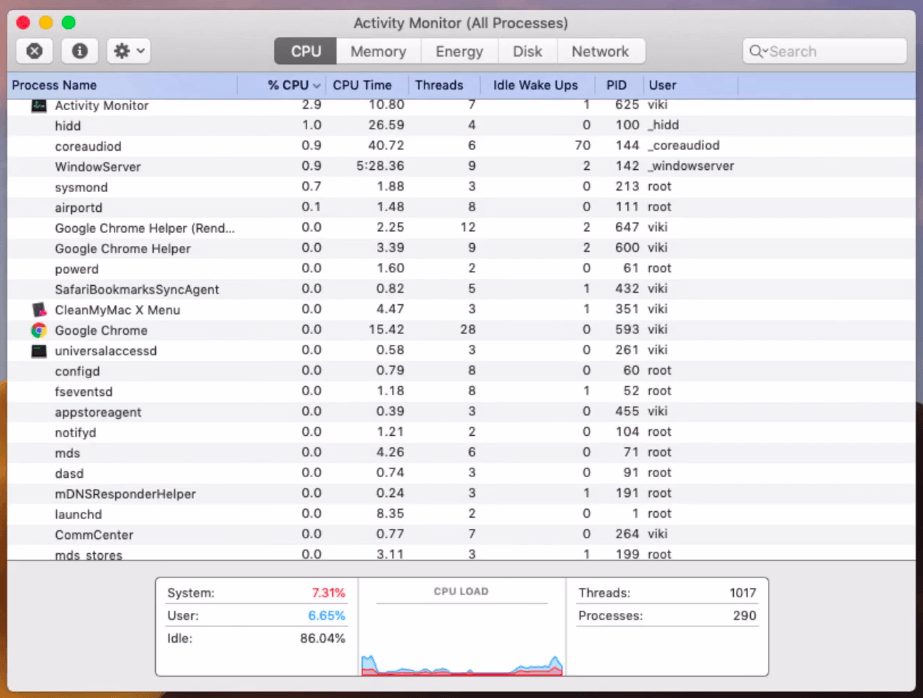
The Activity monitor has several features. You can track your CPU usage, memory output, disk space, network, and later versions cache.
Kill an application on mac
Under each section, you will find the application running list in the current operation and the background processes. The System apps, users’ apps, and operating system files would be visible in the Activity monitor.
Moreover, the filter process makes the selection of the application easy. You can choose the columns to find the application that you are looking for in the system.
Click the “View” tab in the menu to display the active application in the particular section.
What is Activity Monitor?
The activity monitor is the utility application that analyzes the computer’s current operating data and presents accumulated information to the user. You can check how much memory is used by the Mac processes, applications, and background OS programs.
You also can detect which application is open in the current window. Additionally, you can manage the available application, close it if not required, and perform the cleaning task to free up space for other operations.
The force quit is a common feature similar to the close tab in the windows computer. If your computer stops working due to a frozen window, you can open the activity monitor section and force quit the application. It will immediately turn off the window, and your computer will start working as usual.
Activity Monitor mac
Open task manager Mac if you want to close the program that is halting the operating. The CPU usage of the computer can be monitor using the mac os task manager.
Task manager for Mac works as the one-stop solution to the user where they get complete freedom to manage their application. Use mac task manager shortcut [CMD] + [ALT] + [ESC] to open the Activity Monitor window.
How to get task manager on Mac?
Follow this step by step guide to launch the Activity Monitor window.
1) First, press ⌘ + Space to open the Spotlight window.
2) Then, type the “Activity Monitor” in the search box.
3) Next, the search operation will look for the application, and it will show in the open window. Click the application to open it.
4) Once clicked, it will open the application window, and now you can perform your task.
How to get task manager on Mac?
How to find Open Activity Monitor from Finder?
There is another option to access the Activity Monitor using the folder hierarchy.
1) First, Open the finder in your dock.
2) Now, you will see on the sidebar menu, there will be a navigation bar. Check for the Application tab. All the default application resides in the application folders. You can access any application and make the changes as per your need.
3) Once you click on the application, it will open a window; now choose Utilities in the application window.
4) On the next window, the utility folder will have the Activity Monitor Application. In most cases, it is available at the top of the window.
5) Now, double click on the application icon to open it. The new window will open where you can find all the active programs.
How to find Open Activity Monitor from Finder
Troubleshooting Mac with the task manager
Apple Mac computer is a well-developed application that provides a seamless process to the users.
Application use in the background process makes the OS run without troubling the computer operation during the service. You can comfortably load heavy software on the Apple iMac computer.
All the progress in the background is individual check by the task manager application. Additionally, it requires memory to be allocated to each file to make them perform at their highest capacity.
Activity monitor mac
Therefore, the Mac user never had a slow down or error problem while using the multiple software.
However, there will be occasions when your Mac computer may respond weirdly. Your Mac OS application might have trouble loading specific software where it requires more disk space, high CPU computing power, or more memories to process the data.
In such a case, if the computer is not able to find the required resource in time, the application will freeze. After that, you will not be able to run any activity on your computer. The only option left is closing the application and make room for the heavy software to run.
When your computer freezes the screen, you will not be able to close the program. You have to take the help of the activity monitoring application to close the current window.
The activity monitoring window permits the user to complete the troubling application forcefully. You can open the window, select the application that is causing the problem, and apply for force close to shut down the operation.
Kill an application on mac
CPU panel in task manager on Mac
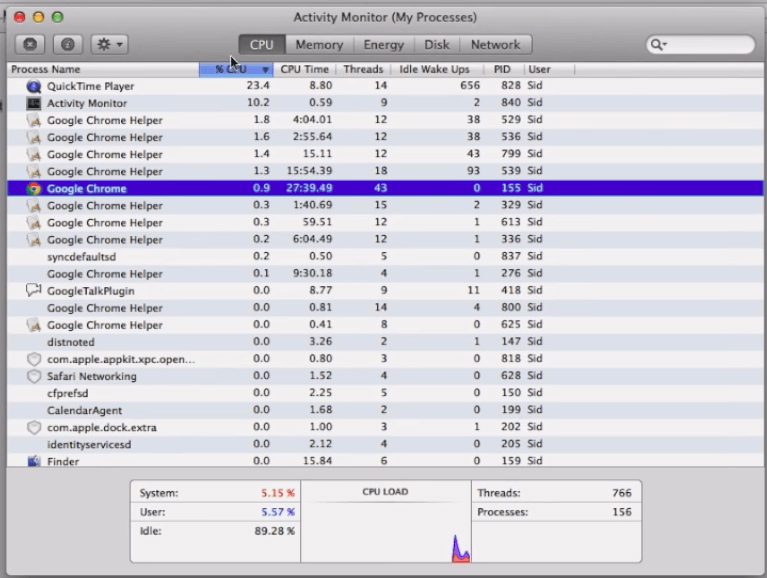
The CPU panel shows the various processes running in the background. The primary function would be of the core computer software and operating system. You should be aware of this application and carefully while closing any application in the Activity Monitor.
If you complete an essential tab running in the background, which is part of the operating system, the computer will automatically shut down, and you will not access the computer for a while. You may have to reboot the computer again before you go back to the Activity monitor application.
The information shows on the CPU pane would tell you how much energy is used by what type of application. Internal processes are depicted on the screen. Check for a high-performance application that consuming more computing power and memory.
You can also check the battery runtime, temperature setting, and fan activity using the activity monitoring application. This information is crucial when you want to maintain the balance in the running application. You can shut down some of the applications running in the background, which is not in use.
Final Conclusion:
Task manager on a Mac is a vital feature in the Mac computer that gives you more flexibility to the user. You can keep your laptop in well condition while working to increase the performance.
Also, Mac’s task manager provides essential data such as a non-working component of the computer, a high bandwidth application, an unwanted application that makes the pc slow down, and can detect the virus and malware.
Follow the given a suggestion the update your existing application, and provide more computing power to your current load. It will increase your productivity and keep your computer away from regular trouble.
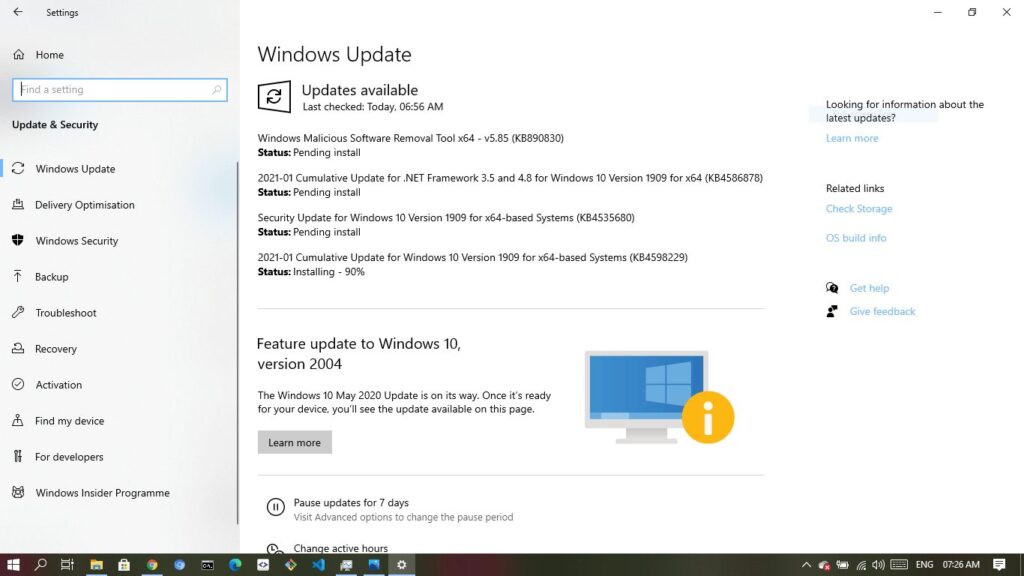
The latest Windows operating software comes with advanced functionality such as automatic update, error fixing, alien file detection, and many other essential background processes that keep your Windows computer in good health. The windows applications are design to protect your laptop and crucial personal files from hack and viruses.
You might be familiar with the auto-update that prompts a new update available for your device whenever there is a new update. These updates let you fix some of the early bugs in your computer and provide seamless operating service.
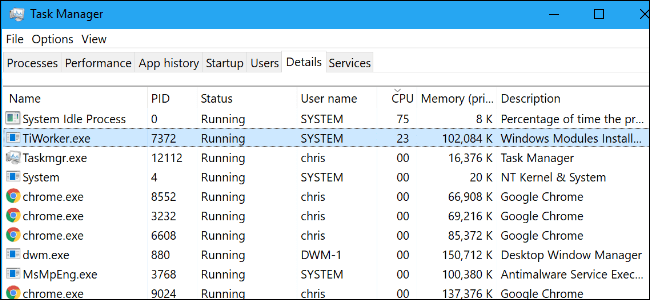
People who are not aware of the windows background process sometimes freak out when they see a new application running in their taskbar. In many cases, you will notice these application names are weird (TiWorker.exe).
Windows Update
The names of these applications are very confusing. People who do not want to take risk immediately do a Google search by asking the online users what are windows modules, installer worker? Do they harm the computer?
The windows modules installer worker is the windows application that runs the auto-update in the background. It automatically syncs with the windows server and checks for the latest update frequently. Windows modules worker updates any new update without harming your current operations.
Your seamless operation on the computer results from the automatic update performed by the windows modules installer worker. The software’s primary job is to remove the bug from the computer and replace the corrupt file from the computer keeping it update to date all the time.
Does Windows modules installer worker is virus or malware?
No. The Windows modules installer worker is not a virus or malware. It is windows authentic application that runs when there is a windows update available for download.
The primary objective of the application is the check the windows server frequently for new updates.
Windows modules installer worker is virus or malware?
So if you see the Windows modules installer worker running on your computer, you do not have to worry about the application.
You can even run the virus scan on your computer to verify the application. The windows defender software detects any application which is not part of the windows application library.
You will get a notification of the exact location of the file. You can take action by deleting the application from the computer, making it safe.
Windows modules installer worker consumes high disk and memory.
When windows modules installer worker activated in your computer, it checks for the new update. The process runs between the windows server and your PC.
It automatically detects the new file and starts installing the files in the background. During the download process, the computer uses internet connectivity.
It may consume your CPU power to boost the download and installation process on your computer. You may encounter the operation slows down while the installation is in progress.
Task Manager
Computer memory consumption goes high during the download process and restricts other query operations, making your computer stop other functions.
Therefore, you should keep track of the unusual slow down while using the computer. You can check the background process in the taskbar menu. See if there is any background application consuming the CPU memory.
Another way to manage the CPU usage is halting all the automatic updates and perform any essential update at midnight. You can stop the automatic windows update by changing the setting in the windows file.
Check for other files as well that requires a frequent update in your PC. Managing your update at your time would make your computer secure, and you do not have to stop your important work during the day.
You can solve your windows modules installer worker high CPU problem by using the wise management practice.
What are tiworker.exe windows modules installer workers?
The windows files come with various names. We still don’t know why windows developers choose such a strange name while developing the application. They can have a simple series of the name or the name that begins with the word windows, so people who view the computer application know that it belongs to the windows files.
Anyway, the tiworker.exe windows modules installer worker is the file that is responsible for the windows update. The software applications require regular updates. The software developer keeps fixing the early bugs in the software and releases the upgrade version of it. These files are then made available for Windows users.
tiworker.exe windows modules installer worker
When you start your computer, the tiworker.exe windows modules installer worker checks for the latest update. If it finds a new file in the database, it connects to the windows official server and starts downloading the new file.
The new file replaces the old one, and the updated file is executed successfully. All the process happens automatically, so you do not have to perform the task manually. Without involving you in the process, the windows software does its job in the background.
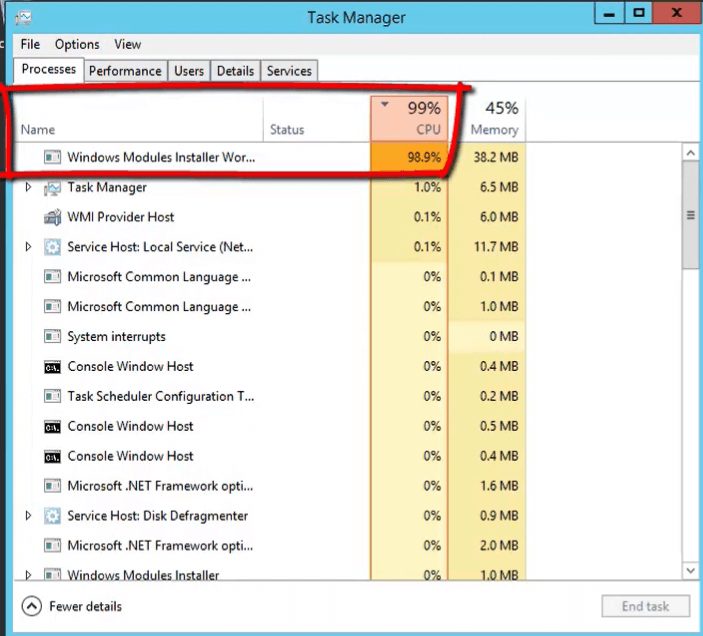
It is unusual to see the disk reaches its ultimate limit of 100 CPU usages while performing a specific task. Many online users report the Windows modules installer worker 100 disk problem.
The CPU reaches the 100 disks because of the high amount of download required to perform the task.
Windows modules installer worker 100 disk
The windows automatic update is performing the background task by analyzing your computer configuration. When the file requires more computing power to download and update the existing windows file, it turns to the disk’s high consumption.
Although the process is ubiquitous in the computer during the update, you should check your configuration while running the update.
The low storage space might also be the reason why your disk reaches 100 percent. Usually, the new windows update is installed in the existing folder.
Therefore, it would require more disk space and memory to execute the task. If your computer has a standard configuration, then the application might not get sufficient operating power to accomplish the task.
There are various ways you can clear the space for the windows to download and reduce the disk usage dramatically.
Following step by step guide would help you stop some of the files that are not in use and let the windows use the free memory while installing the new update.
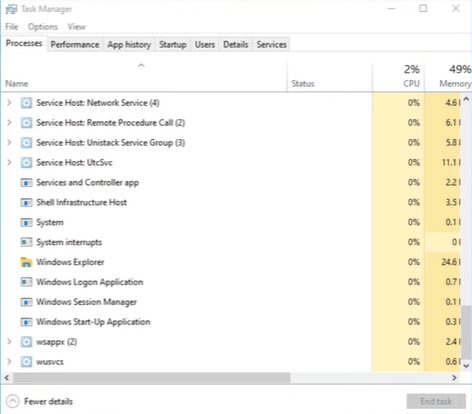
1) Go task manager window. You can do this by holding Ctrl + Alt + Delete. The open windows will have a task manage option. Click on it, and it will take you to the task manager window.
2) Next go to process. At the top of the section, you will see the current application running on your computer. Below that, there will be applications that are running in the background. Most of the background application would be related to the operation of the window.
Remember that do not stop or change any activity without knowing the file’s importance. Deleting or halting the windows files would prevent your computer or, in the worst case, it will shut down automatically.
3) Once you are in the task manager, check for the active application located on the top section. Close applications that are not in use.
Save before closing the file to avoid data loss. You complete the application by clicking the right button on the app and select the end task.
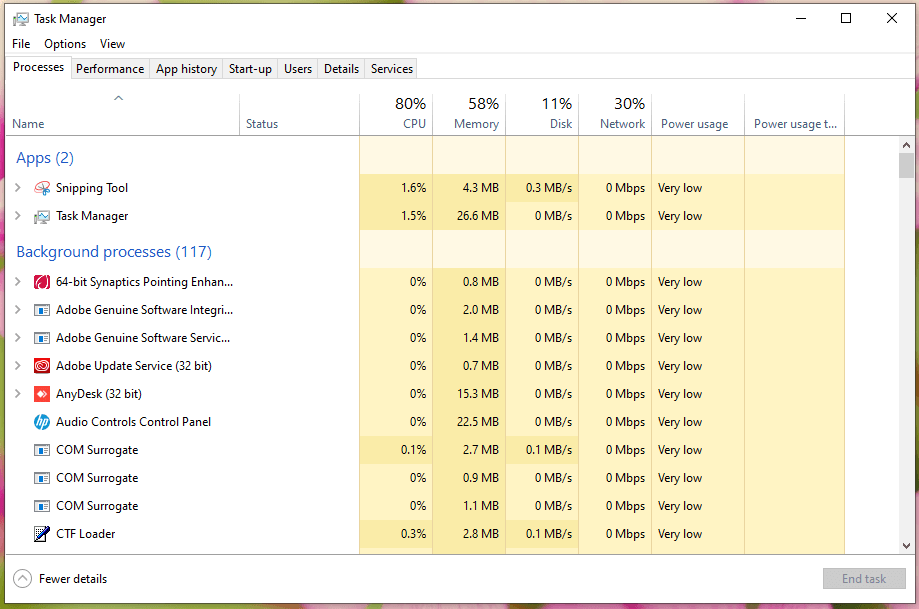
4) Now, move to the background process. Check for any known application installed on your computer, such as Google Chrome, Skype, Team manager, etc.
Task Manager Windows – Background processes
These are third party application which runs in the background when not in use. Close the application similarly as you did for the previous application.
5) Once all the applications are stopped. You will notice a drastic drop in CPU usage. The application that was consuming the memory is not stopped cleaning the space for the windows update.
Now when there is more space to use, the windows update can perform faster than usual. Windows will complete the update quickly.
Stopping not in use applications would solve the windows modules installer worker high memory issue in your computer.
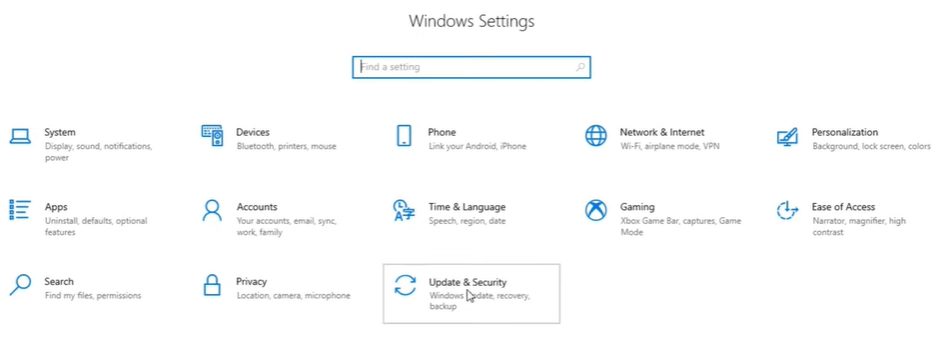
How to disable Automatic Windows updates?
If you are not willing to run the Windows modules installer worker while working on your computer, then the best way to stop the application from operating is to disable it.
However, this is not recommended, but if it is creating a problem during your working hour, then disabling it would be the final option that you have left in the end.
Windows Update
The tool activates the function automatically whenever it detects the windows update. It automatically starts the update without notifying the users in the background. The process could be sober, and it will consume a fair amount of your computing power.
Here are the steps that you can follow to disable the windows updates
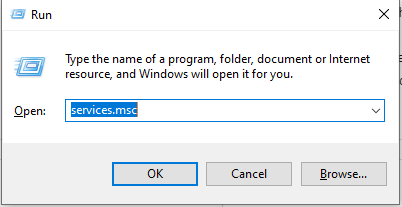
1) Type run in the start menu. Or click the Windows key with R on your system.
2) After that, type “services.msc”. Next, click on the OK button.
services.msc
3) Use the search box and type the “Windows Module Installer.” Now open the manual from the drop-down to access more options. In the default setting, the system is set automatically, or in some computers, the environment will be the workload.
4) Next, find the tab and double click on the windows update option to open the setting.
5) In the new window, select the startup type to manual. If it has a disable option, then set it to disable the application.
6) Press OK to save the setting
7) In the final step, restart your computer to allow the setting gets updated in the system. Now the Windows update option may have become inactive.
It will not bother you anymore. It would be best to take care of the software’s manual update to keep your system up to date.
Why windows modules installer worker requires more system CPU or disk memories?
The windows modules installer is one of the windows applications that run all the time in the background. It is always searching for the update on the windows service.
During the searching process, it uses internet data to perform its search. The application is the automated software located on your system.
The software is similar to the other software that you download on your computer. As you are aware, every software requires computer memory and disk space to perform its task.
Windows Settings
The windows modules installer has not exceptional to this requirement. It also seeks the required memory from the system and the disk space to get the windows update.
The software is instructed to perform the update task on high priority, even if you are working on your computer. The reason for giving ti preeminent role is to protect your computer from recently detected viruses and malware.
Windows operating system collects the information from all the computers that are running on the Windows OS. Whenever it detects common malware issues on the user’s computer, one patch update to solve the bigger virus problem is develop and made available for the windows users.
It is crucial to update your windows software to avoid the virus from getting installed. Once thee is a virus on your computer, it may shut down the windows update or corrupt the file on your computer.
You may no longer have windows real-time service that protects the information from hackers.
That’s why the windows software gives utmost priority to the new update and keeps all the running applications on secondary importance to prevent a data breach from the computer.
Is windows OS provide a manual setting to update time?
Windows also provide a manual setting to change the update time, so it would not disturb you while working on your system. You can set the midnight time and keep your PC on while windows will update the required files and automatically shut down the computer.
Another reason why the windows modules installer worker takes time is the difference in the time zone. Windows servers are located worldwide.
In some cases, the Microsoft application runs in a different time zone, and your computer runs in the regional time. The mismatch in the local time zone may cause the issue while downloading the new update. Some upgrades may get left out if the computer is shut down during the update.
Windows Update
When you start the computer, the windows modules installer worker initiates the download process and continues the download again from the beginning.
Therefore, you may see long hours to download a single file. The application normally gets stuck in the loop where more resources are consumed during the download process.
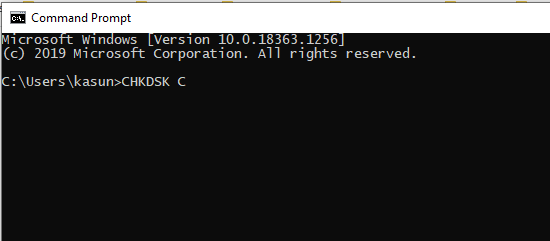
Disk Drive error behind the high CPU usage
Ensuing the problem of the high CPU usage is not the reason for the disk drive errors. The corrupted Disk drive files require replacement with the new one that drives the application. When such an issue occurs, the high disk usage causes the problem, and the system becomes unresponsive.
Usually, You will notice the disk and CPU reaching 100% usage. The other application may encounter the freezing problem. You will not be to perform simple tasks on your computer.
You can check the disk drive error with the windows CHKDSK common. When you run this common in the standard module, windows perform a disk check procedure. It analyzes the problem and notifies you of the error in the disk.
CHKDSK Command
The bad sector is fixed, and the corrupt file is updated. Once the disk problem is resolved, the high disk usage would go down, and the system will normalize the operation.
You can set a scheduled disk check to avoid disk problems in the future. The system will run an automatic sequence to check the disk usage, overall health, and corrupt file.
You will notice, the problem will be solved immediately, keeping your system ready for the work. Remember to restart the computer when you download or update windows files. The system needs a reboot to apply the changes.
When windows detect the problem with the existing disk, it reports to the user. The system automatically gets restart to protect your files. During the restart process, the missing file is installed.
The error files are fixed, and the final repair is conducted to upgrade the existing files. You will smooth the functionality of the system file after the issue is resolved. Your computer will no longer have a technical problem.
Conclusion:
Being aware of the windows file would enable you to stop specific programs running in the background. It will increase the efficiency of your computer. You will never have the same problem again and you will able to work on your computer with ease.
Manage your computer like pro users and take control of the application that is running on your system. Also, be aware of the fake application that looks similar to the windows file. You do not need to get confused seeing such a file running in the background.
Do facts check before taking action and keep your computer safe from the virus and malware. People who maintain good practice while using their computer never face such an issue in their system.
You can also watch the following video on windows modules installer worker.
Every modern device comes with a reset button. Some will have hidden buttons with a small hole at the bottom that reset the device to its factory setting, and some smartphones allow users to reset the device using the setting options.
The reset function is given to remove the unwanted files that are causing the problem. Reset setting deletes cache, third-party applications, files downloading after you start using the device, and anything that was not part of the default settings.
The reset button sometimes becomes a life-saving function. There will be occasions when you might not be able to use your device at its full performance.
The error may cause during the operation of the device that may start showing problems while using it.
Numerous reasons might cause this problem, which leads to the non-functional device. The only way to solve this problem is to reset the device, rectify the situation, and remove the corrupted files.
Apple AirPods has the reset button on the device. It is a small pinhole that resides on the backside of the case.
You have to use a small size pin to reset the Setting and activate the reset procedure. When you start the reset button, the device will automatically bypass all the settings and set your device to factory settings.
If you have any problem with charging or any other issues with the device, you should use this reset option to get your machine back to the standard settings.
How to factory reset AppleAirPods?
Start the reset procedure by keeping the lid open. Press and hold the setup button, which is available on the back of the case. Hold it for about 15 seconds. When you see the status light flashing amber on the device, it indicates the reset procedure is complete.
Follow these step by step guides to reset the Apple Airpods.
1) Before you begin the reset procedure, put your Airpods in their case, and close the lid. This step is vital to reset the Airpods.
2) Now, wait for a minimum of 30 seconds and open the lid.
3) Now, take your Apple phone that is connected to your Airpods device. Go to Setting> Bluetooth and then tap on the circled “i” icon. It will be available next to Airpods.
4) Next, click on the tab “Forget This Device” and then confirm the Setting again.
5) Now open the Airpods case lid. Keep it open during the procedure. Now touch and hold the switch on the rear of the case. Hold it for 15 seconds.
You will see the status light flashing amber on the device after the reset procedure is fully complete.
Note that if your Airpods case has the wire connection for the charging, then the status light would be available inside the case.
On the Airpods Pro case with wireless charging facility, the status light is on the front of the case.
The given procedure applies to both the Airpod basic version and the Airpods pro. You can reset Airpods 2 as well using the above steps.
If you found AirPods and want to reset the device to its default setting, then either you use the Smartphone device to reset or use the direct reset button given on the case itself.
Hold the reset button available on the case for 15 seconds or more, and it will automatically reset to its default setting.
Remember that you would not turn the previous Setting back once your Airpod is reset to the default setting.
So before taking action, you should consider various aspects of the reset procedure and decide based on your requirement.
The method of resetting Airpods is relatively easy. The device is compatible to easy to reset functionality that makes the resetting easy. Airpods case that comes with the device has an inbuild reset button.
Hold the reset button on the case and wait for a few seconds until you see the status light start blinking. When the light appears, it indicates the resetting procedure has been completed.
Your device is not ready to use, and you can start using it as the device came through the factory.
You do not require to connect the Airpods to your phone to run this resetting procedure. After the resetting is done, you can connect your Airpods and start using them as usual.
How to Reconnect your Airpods?
Once the factory reset is complete, the next step is to reconnect your Airpods. Keep the Case lid open during the connection procedure. Place your AirPods close to your device.
You will be prompt with the process on the screen of your IOS phone. Follow the instruction, and your Airpods will be connected instantly.
Learning the reset features would help you in the bad days. Whenever your Apple Airpods start causing problems, the resetting should be the first that you could perform by yourself.
Instead of taking the device to the repair center, do the resetting and see if that solves the problem.
The majority of the issues are identified and solve during the resetting, and your device would start working usually. In case the device does not turn normal, you can consult with the repair center to find the cause of the problem.
Apple Airpod, Airpod pro, and Airpod 2 all come with the reset button. You can find it on the case itself.
Either you use the Smartphone or the case to initiate the reset procedure and let the device fix the problem. Once the error-correcting is made and the reset is complete, your device will indicate the case’s blinking light.
After the resetting, start the machine again and see if the problem is solved. Check the charging status before initiating the reset.
The case should have sufficient charging to complete the resetting procedure. Your device would turn to new, and you will be able to use it comfortably.
Avoid frequent reset as it may damage the core software, and your device might not work properly.
You can check for airpod prices here in the apple official website.
In today’s data-driven world, Storage is one of the challenging parts of life that every computer user has to deal with in everyday activity. No matter how much storage capacity your device will encounter a problem after a certain period, your computer will prompt you to increase the storage capacity to save more files.
Additionally, the computer system that uses more than 70 percent storage becomes slow due to the storage devices’ background process.
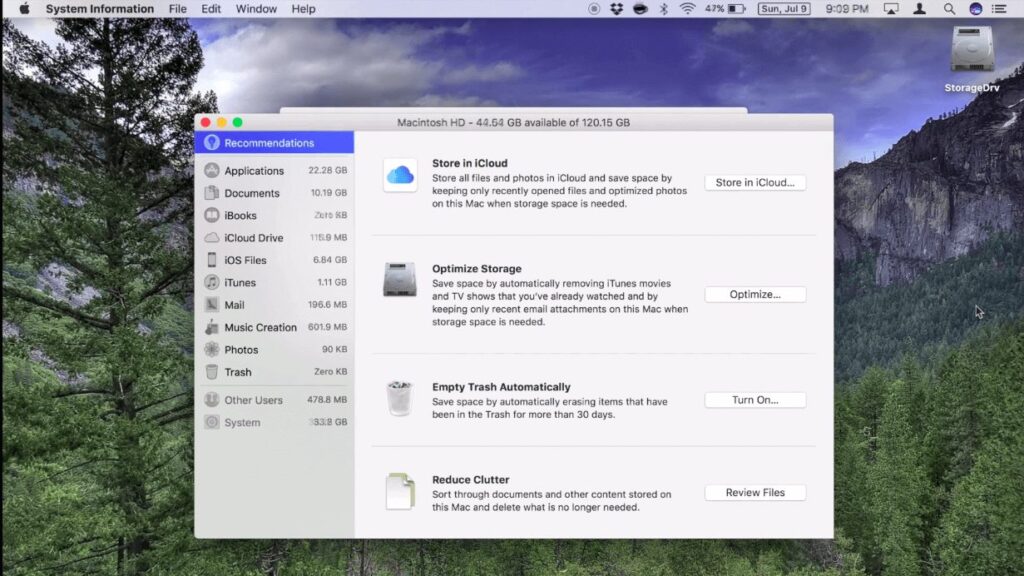
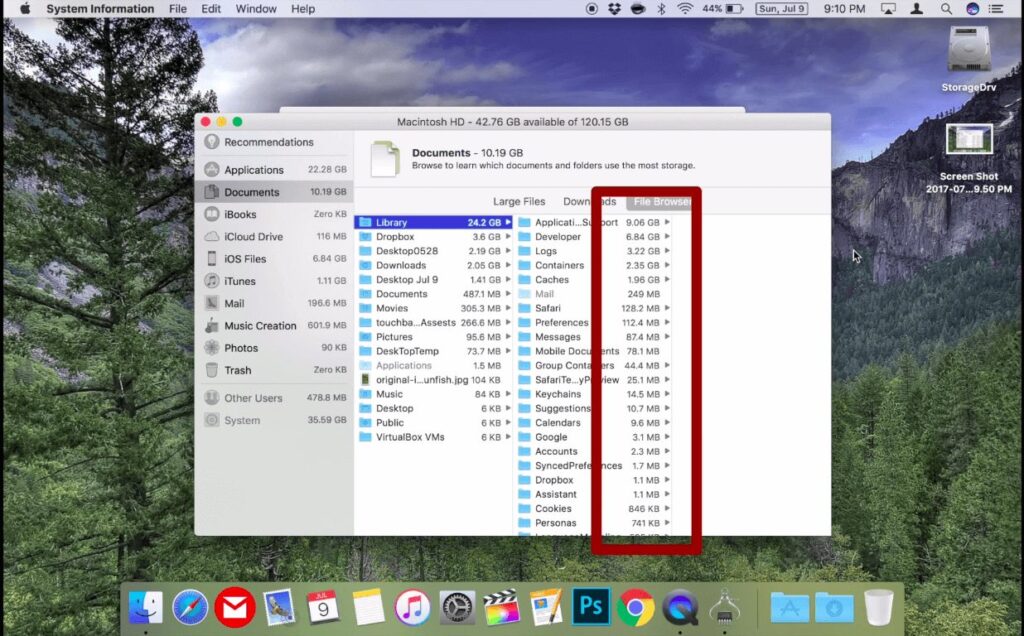
mac recommendations to clean the disk
As soon as you start the computer system, the hard drives go into calculation mode, where they run many background processes to keep your files ready to access.
The good thing is cloud storage is becoming more popular these days. You can upload all your files on the cloud storage and keep your computer clean and neat.
No files need to be stored on the local drive. Upload everything on the Cloud server and make room for the everyday files that stays for a few days and then transit to the trash bin.
Here is the guide to free up space on mac that allows you to manage your files effectively.
Optimization of the Storage helps you to save much space on the computer. Using the iCloud service offered on the Apple device would protect your data from loss.
You will always have the backup file on the server. Once the file is uploaded to the server, you will access it anywhere in the world.
Remove duplicate files:
It is the most common problem that everyone would identify in their storage system. We make duplicate files while working to protect our essential files.
Also, sometimes the downloaded files from the web or the email id resided in the folder, making it duplicate every time you download it again from the email.
Over the period, these files were converted into a stack of folders with similar files. The only way to avoid such mistakes is to arrange your folder in proper order.
Develop a habit of saving your files downloaded from the folder in the temporary file. All the files downloaded in the temporary folder would not be necessary after some period, so you can comfortably delete them.
The files you want to save on the computer for a long duration should be placed on the hard drive. Please do not keep it on the desktop.
how to free up space on mac
Data organization and management skills would help you clean your PC quickly without worrying about the critical files.
The duplicate file would have consumed a fair amount of space on your computer system. Now when you look back to those old folders, you will realize these files are no longer essential, or you already have a copy of these files some other place.
You will not find what is lying under the carpet until you check these folders one by one.
Take the help of duplicate file detection and removal application. These applications will help you to identify similar files and prompt you to remove them with your confirmation.
Once you confirm the removal, the app will move the file to the trash folder, automatically deleted after a particular period.
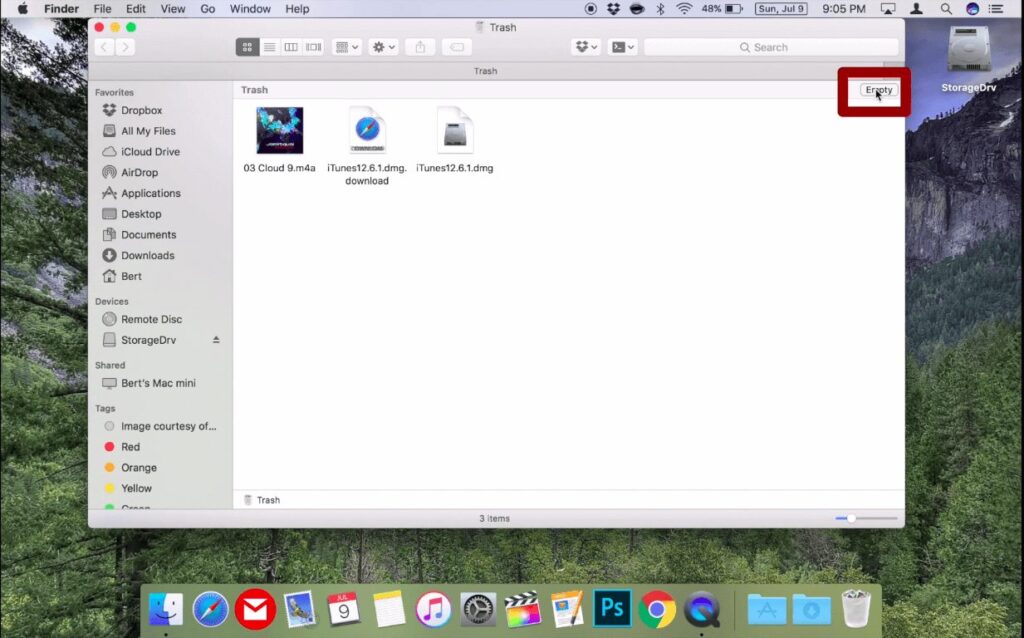
Clear Trash Cans
The files that you delete from the computers goes into the trash cans. The Trash Cans’ storage space is directly connected to the storage drive used by your computer system.
Loaded drive with unwanted files would result in slow computing power. You should frequently empty the trash cans folder to avoid computer slow down issues.
Remember that once you delete the files from the trash cans, you will not recover the file. So before deciding to delete, double-check the file and choose after you are sure about the files.
clear trash on mac
Also, check for the individual trash cans of the media file. iPhoto, iMovie, and Mail would have their separate trash cans.
When you delete the files from these media application, it goes to their trash cans. All the deleted files stay in the trash cans for several days before it is permanently deleted.
If your job is related to the media file, there will be lots of media files that might be in the trash can.
Every file would add weight to the storage drive, and eventually, your storage drives would alert you to make the space for the new files. You will not save new files on your computer until you make room for the new files.
clear trash on mac
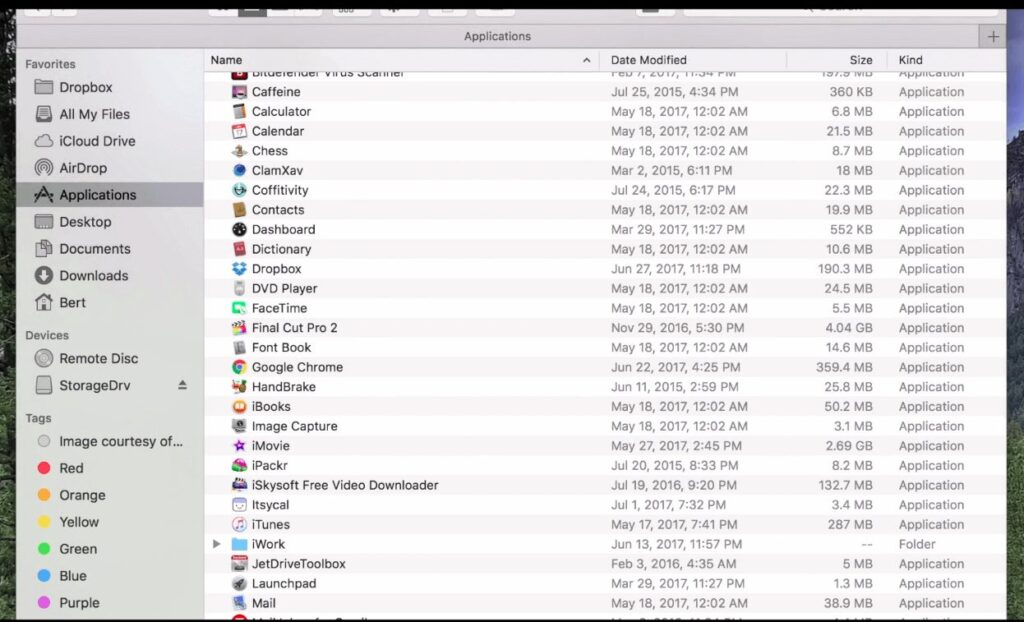
Uninstall unwanted Softwares:
Computer users tend to download the software and install it on their computer when they want to use the application.
We download the application when we have a requirement, but we generally forget to uninstall it after the job is done.
Over the period, these software lists become huge, and you would have no update on how much software is installed on your computer, which you do not use.
Remove unwanted software on mac
Therefore, you should keep an eye on the system files frequently to avoid any software-consuming space in your computer system.
Remove all the software that you are not using from the computer. Delete the files related to the software after confirming that you would not require them in the future. Knowing what is there in your laptop would protect your computer from unwanted applications.
Clean Itunes Backups
If you are using other IOS devices such as the iPhone and iPad to transfer the data from one device to another using iTunes, backup files will dwell on the system.
There will be a bunch of media files in the backup folder with massive storage consumption. You can delete them and free up the vast space of your storage drive.
Every time you connect your device to the computer, the iTunes application creates Storage on the system, making it safe to move the file back and forth quickly.
In case you lost your phone, your backup files would be ready to restore the data on the new phone. Backup files protect your data from permanently lost.
However, deleting old files would allow you to keep your data up to date and reduce the file size to a great extent.
Mac Utilities
Delete Temporary Files
Every computer system uses a temporary file system to increase the file loading time. These files are temporary files created when you use the application, the browser windows.
The temporary folder is used to check the recently used file and presented to the computer screen when you access the same file next time.
The temporary file loads much faster than the file that you close and open again from the start.
Temporary files are generally deleted after a certain period. But there might be some files that may be using your storage drives.
Some application keeps the temporary files for a more extended period than usual. Such temporary files take up disk space for no reason.
Cleaning the temporary files would make more space for the other important files. The majority of browsers have a built-in function that uses temporary files to boost browsing speed.
If you are spending more time on web surfing, then many temporary files would have installed on your computer.
The fastest way to clean the temporary files is by using a third-party application. The specially developed software would detect the temporary file in your system and show the information about what type of files are saved on your device.
You can check all the files instruct the software to delete them and clean the disk space.
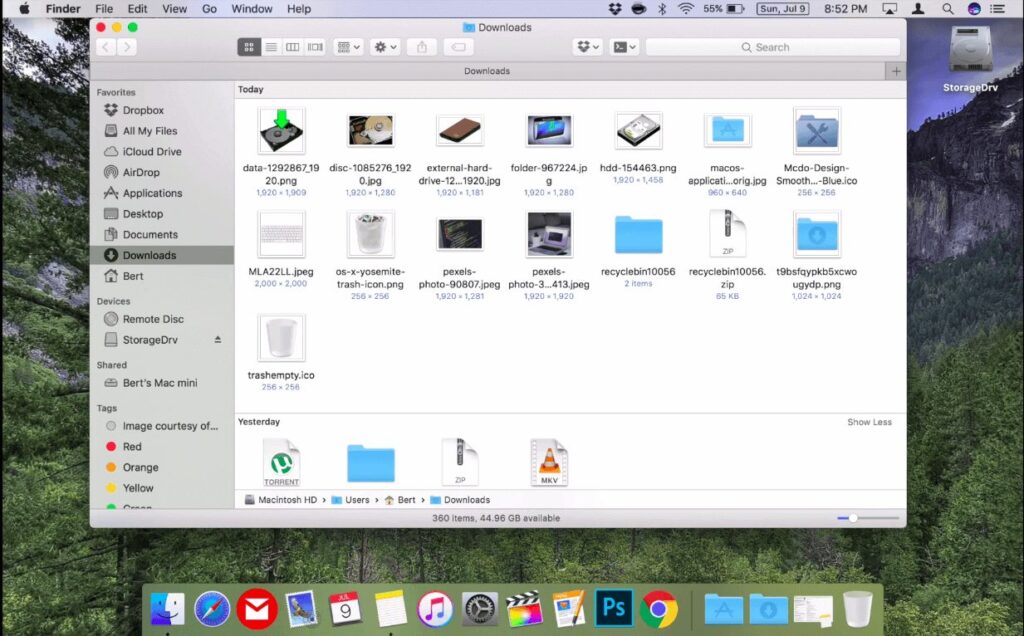
Clean your download folder
The download folder is another file that is moderately high in storage consumption. All files downloaded from the web goes into the default download folder on Mac.
Over time the size of the folder increases and reaches the point where your attention is needed. In most cases, the files available in the download folders are already used, or you may not be going to use them again.
Clear unwanted files from downloads
We generally move the essential files from the download folder and keep them aside in a separate folder. It means the files that are in the download folder are consuming unwanted space.
Deleting the files from the Download folder will free up the disk space. Advisable to visit the download folder frequently to manage your files. Clean it regularly to avoid more space used by the folder.
Remove Language Packs
Every app you install on your system would have separate Language packs with it. When you run the application, the language details are presented to the user during the installation to choose their preferred language.
You can set your language later as well by going to the app setting section. It is good to have such features in the application, but you may not frequently use these features after the initial installation is done.
The file stays on your system until you uninstall the software. These files are just wasting your space. You can delete the language pack without harming the core application features.
Follow these steps to delete the language pack folder.
Go to the application.
Next right click on the app. Click show package contents.
Now click on the content to open the folder.
Click on the Resources folder.
It will open the file where all the language files will be kept in ascending order. Keep your preferable language and delete all other language files.
Follow this step to all other apps and remove the unwanted language files from the system.
Optimize Storage
Optimization is required when you know you have many unwanted files on your system. Organizing and optimizing the files would allow you to save more files without paying for cloud storage.
The monthly fees of cloud storage can be avoided if you develop a storage optimization habit.
Your computer would have several media files, such as movies and videos that you have already watched.
You may not require these files again. The average movie file with 1080p would consume more than 1 GB of disk storage. Deleting all the movie files that you will not watch again would remove a big chunk of files and free up space.
Remove unwanted files on mac
Similarly, check for the TV Shows, pictures, video clips you saved on your system in the past. Remove them to clear the path for the new files.
Additionally, some of the desktop movie streaming application save the files on the computer when user request using the later watch feature.
The application downloads the background files and stores them on the later watch section on the hard disk.
If you are using any third-party movie streaming application on your Mac computer, check for the backup files.
There will be several files that you have already watch or kept in the watch later folder. Clean the folder and make room for a new download.
Learning storage optimization would lead to more space on your computer. You will be able to do more stuff on your PC when you have sufficient storage space in your system.
As the cloud storage cost is rising, it would be wise to work on your habit rather than pour money on unwanted file storage.
How to free up other space on mac?
There are several applications on your MAC computer using a good amount of disk space. Take the example of the Mail. The files received on the email are using the local storage space.
Deleting the unwanted attachment would free up the disk space. Similarly, many software would have a backup system. Every time you perform the software task, it creates the backup files through the autosave function.
These backup files need to be handle manually. If you are not going to use the saved file in the future, you can delete them instead of keeping them on the computer.
Check all the applications that you have download recently. The activity Monitoring program also guides you about the application that is running in the background.
Check each application personally and check unwanted applications that you can remove from the system.
4 Easy Steps to Delete “Other” Space and Speed Up Your Mac
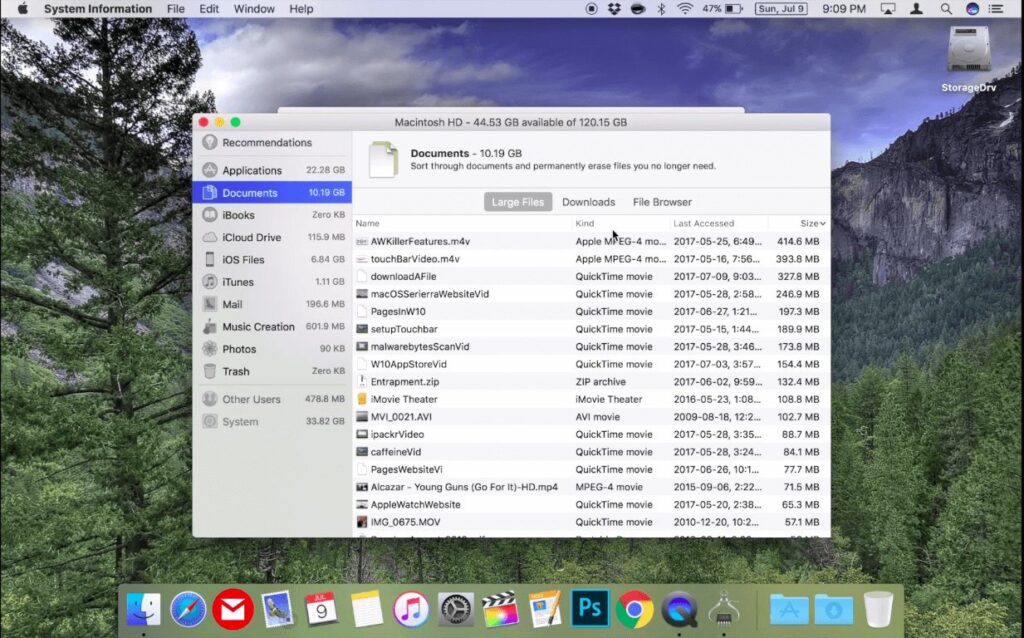
How to delete files on mac to free up space?
Deleting files on the Mac computer becomes easy when you know what to delete and what not. People generally begin the deleting process where the file is using little space.
It would be best to think of the files that are consuming a large amount of storage space. Generally, these kinds of files remain in the software system and media file folder.
Check the unwanted media files before you start deleting any application. Delete all the media files such as video, music, photos saved on your computer you no longer use. It will clear the ample disk space.
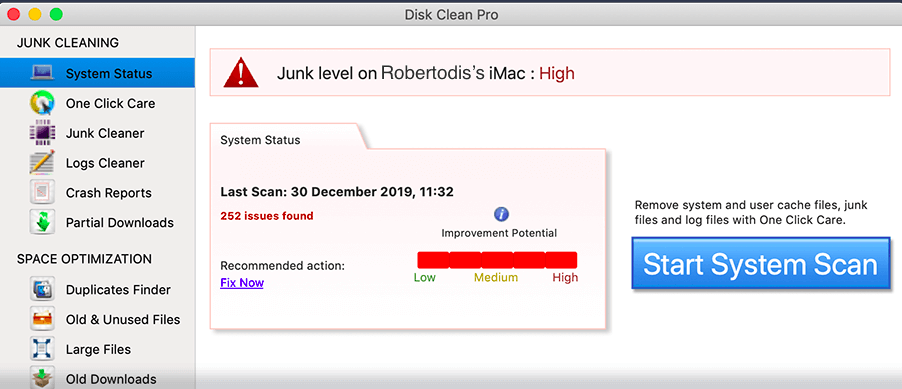
Next, download the “Disk Clean Pro For Mac” application, one of the best software for deleting the log files.
Disk clean pro
The log files are the temporary files that save the activity report on your computer. Run the downloaded application and clean the unwanted log files from the PC.
In the final process, start looking for the unwanted applications installed on your computer. You might have installed them in the past to conduct a particular task, but today you might not be using them.
Every software would have its backup file where the data is stored. Removing the unwanted software from the PC would free up disk space.
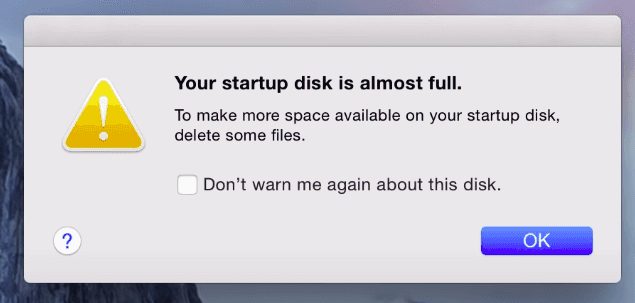
How to free up space on Mac startup disk?
The full Mac startup disk is the most common problem people deal with their Mac computer system.
The basic functionality of the MAC operating system requires the files to be stored in two different types. One is the actual files, and another is the temporary files.
It does this to speed the operating process during the repeated task.
These junk files reside on your computer for a very long time. Over the period, the files stack on each other, consuming large size disk space.
On top of that, the backup and cache files play their role in storing the data. These files are killing a vital area for no reason.
Startup disk is full
The file that you no longer using would have its cache and backup files in the temporary folder. It stays there, consuming the storage space.
Removing the temporary files stored in your computer system would protect your device from disk full issues.
Freeing up gigabytes of memory would enable you to save important files, and it would not affect your data.
Conclusion:
You will be able to do much more with the MAC computer’s storage space if you know what to do with the file saved on your computer. Following the above given a suggestion would enable you to protect your storage device.
Do much more with the available storage space when you have an optimization process to save your file.
Your computer also works smoothly when it has sufficient memory and storage space to use. It performs at its optimum level resulting in more work done, and faster output is generated.
Understanding why the disk space reached its maximum capacity would help you make appropriate decisions to reduce the storage size. Follow the given suggestions and start applying them on your Mac computer.
Modern browsers are occupied with the time-saving features that users should use while using them. Form auto-fill facility is among the wide range of services you enjoy with the Chrome browser.
The auto-fill allows you to fill the pre-store information in the form, making the registration process easy. Your user name, email id, address, phone number, and password is saved in the browser.
The information automatically triggers when it sees the form on the website. Form fields are filled with the required details. You can verify the information and click the submit button to register to the website.
The simple process enables users to save time while browsing the web. Therefore, many users seek the import password to Chrome on the web to make their surfing easy.
The following step by step guide will allow you to import your browser’s password and start using your login details in the auto-fill options.
Google Chrome alerts you to import the password details while installing the browser; however, you can do it later if you have missed the setting.
You can comfortably import the password from other web browsers such as Microsoft Internet Explorer and Mozilla Firefox.
Photo by Pixabay from Pexels
How to import passwords into Chrome?
First, go to page chrome://settings/importData by putting this path in the Chrome address bar. It will open the import bookmarks and setting menu section.
Then select Mozilla Firefox or the Microsoft Internet Explorer as per your choice. Remember, the Google Chrome browser will collect the passwords for the browser where it is already stored. If there is no data in other browsers, Google Chrome will not find any information, and as there is no data to add to your Chrome it will remain the same without importing.
Ensure that you have chosen the “saved passwords” option while importing the data. This will instruct the browser to import the saved password from another browser and use it.
Then, click the import button to initiate the process and start importing the data. The data will be imported without needing any manual operation. Wait for a few minutes, and all the data will be added to your Chrome browser
Similarly, you can repeat the process to collect the password from the other browsers as well. The import process is the same. So, it will add the data to chrome without needing much effort.
import passwords to chrome
Import passwords from Chrome to Firefox
There will be a time when you want to sift your web surfing from Chrome to Firefox. Google Chrome allows you to transfer the data to other browsers with a simple process.
On the other hand, Firefox has made the process easy. The Quantum feature can import the data such as bookmarks, passwords, history, and cookies from Google Chrome to Firefox with the click of a button.
Method to import from Chrome to Firefox browser
Remember that when you install the Firefox browser on your computer, it will prompt you to ask whether you want to import your password and other browsing data from other browsers such as Chrome or Microsoft Edge.
You can select the option while installing and initiate the import process at that time. However, if you have missed the message, then do not worry. The following manual process will guide you in getting your data back to your browser.
Go to the Bookmark manager setting. To open the location, click the “Library” icon available on the top right-hand side toolbar. Select “Bookmarks.” Then go to “Show All the Bookmarks.” If you want to open the setting using the shortcut, press the “Ctrl + Shift + B” on your computer, and it will open the page.
Next, click the “Import” tab and then the “Backup” button. The setting is available in the toolbar section. Choose the “Import Data from Another Browser” and move to the next step.
Then, you will be asked to choose the browser from where you want to import the data. Choose “Chrome” in the import wizard. Click next to proceed ahead to Firefox Quantum. Remember to close all the Google Chrome browser windows before you initiate the import process. Else, the process will be halted midway, making the import invalid.
Firefox will prompt you with the message instruction what kind of data you want to import. You can select the browser as per your choice in case of more than one browser or profile. Your data will be chosen from the particular browser and added to Firefox. In case you want to add the information from both browsers, follow the same instruction again, and import the remaining data from another browser.
Firefox will initiate the import process. It will start importing Google Chrome stored cookies, History, password, and bookmark set in the default mode. You are given the option to uncheck the information that you do not want to import.
The import process may take a few minutes to complete. Your imported data will be added to the separate folder named “From Chrome.”
Import Passwords from Safari to Chrome
Google Chrome has made the password import easy from the Safari browser.
Open your Google Chrome browser on the computer.
Click on the “More” tab. It is available in the top-right-hand corner.
Now select “Bookmarks” and then click “Import Bookmarks and Settings.” This will take you to the page where all the data is saved.
Select the browser from which you want to collect the bookmarks, such as Safari. Then hit the import button, and the Chrome browser will initiate the import process. Wait for a few minutes. The time it will take to transfer the data will depend on the size.
Once you are successfully importing the data from Safari to Chrome, you will now be able to run the auto-fill of your existing user name and password in the browser.
Import passwords from chrome to LastPass
You can quickly import your saved user’s login details and credentials from Google Chrome to the LastPass. The inbuilt Google chrome password management allows the users to manage their store login details.
You can even download them in the CSV format and upload them wherever you want. The Direct fetch facility is also available, so you do not have to go through a manual process.
Here is the step by step guide to import your LastPass Via Chrome
LastPass Password Manager
Go to the Chrome browser. Click the inactive “LastPass” icon available in the toolbar.
Now, enter your username and master password to login into the “LastPass” account.
Click the “LastPass Icon” in the web browser toolbar.
It will take you to the new page. There you will find “Account Options.” Select the given option and go to the “Advanced.” There you will see the “Import” option.
In the next step, select the Chrome Password Manager.
You will find a list of all your login credentials marked as selected. Before moving to the import, you can uncheck the certificates you do not want to import into LastPass. Kindly remember that all your predefine data will be imported to your LastPass account if you do not unselect the option.
Click import, and when the message is prompted, click ok and confirm the import process. Now you have successfully imported the data from Chrome to your LastPass Vault. You will be able to access all your login credentials using the LastPass account.
Import from CSV
1) Enable Password Import Flag in Google Chrome.
It is easy to import the data in the Google Chrome browser using CSV settings. To do that, you have to enable the password import flag in Google Chrome.
Type chrome://flags in the Google Chrome browser tab. Press enter, and it will open the new page.
2) Now type the password import in the search bar option located at the top of the page. You will get the password import browser flag.
3) Now, on the right-hand side corner, you will find a drop-down menu next to password import. Select the Enabled in the drop-down to allow the import process.
4) Next, click the re-launch button to restart the browser to activate the setting. Kindly remember, the settings get update when you continue the window.
5) Once the Chrome window is open, Go to the Chrome Menu and then click Settings.
6) Under the Autofill section, you will find the passwords tab. Click on it to go to the next page.
7) You will see the “Save Password” setting option. On the right side of it, there will be three dots icons. Click on it.
8) Pick the CSV file that you want to import via the file explorer. You can select the CSV file, which has all your credentials and clicks open.
9) Upon successful import, you will find the password imported in your Chrome browser. Kindly note the similar entries will be replaced. The password import using CSV file will stay enabled until you keep the flag setting allowed. If you want, you can turn the setting off.
You might have encountered the unusual sound of the CPU fan. Sometimes the fan goes heavier and makes too much noise. The CPU fan’s sole purpose is keeping the internal system, especially the core component such as RAM, CPU, and Motherboard, cool. You can monitor the fan system if you have fan control software installed.
This component requires a moderated temperature to run the computer smoothly.
Basically, the CPU fan would result in the computer shut down; in the worst scenario, the PC hardware will stop working. Therefore, it is necessary to keep the fan in active mode when you are using the computer.
You cannot switch off the fan or remove them deliberately to mitigate the sound it made while operating the computer.
Photo by Dave Morgan from Pexels
Do you know there is software available that enables you to monitor your CPU fan?
The software is developed to moderate the fan speed and the other essential aspects of the CPU. Whenever there is a need for 100% efficiency, you can increase the setting to make your fan perform at its peak level.
If you face trouble, such as the noise it produces during the operation, you can reduce the fan speed and keep it at a mid or low level.
There will be several reasons why your fan may cause noise. It would be best to ask your hardware engines to check the problem before it causes damage to the internal component.
Fan settings:
Generally, the fan settings are out of reach when you are operating the average computer. The desktop computers or the laptop have the setting inbuilt, but you much have a technical background to moderate the location.
The average user who uses the computer for a routine job might not have sufficient knowledge to access the computer’s core functionality.
Photo by Pixabay from Pexels
The fan control software options provide needed support to the users who do not understand the computer software language. The Fan control software is easy to use and offers instant access to your computer fan. You can open the software and change the setting as per the need.
Whenever you see the fan is making noise, you can turn on the fan or slow down the speed using the control panel.
Why is the CPU fan so loud?
The sound coming out of the fan can be distracting and annoying while working. If you are working in a closed cabin, the CPU fan’s sound may become unbearable after some time. Eventually, you may think of shutting down the computer and stop working.
Generally, the computer fan is kept on high-speed mode to provide maximum airflow in the system. The hardware component requires the consistent flow of the air to remove the heat from the system.
The computer’s heat production would make the small parts of the CPU burn after a specific temperature. In order to avoid damage to the core component, the CPU temperature needs to manage and cooled down rapidly.
A high amount of energy circulates into the system whenever you operate the computer. The computing process heats the core parts while you are working on the PC.
Photo by Miguel Á. Padriñán from Pexels
Primarily, high-end graphics card uses while playing games or running complex applications requiring maximum RAM for processing data would result in a high amount of energy consumption for the device.
The excessive amount of heat gets removed with the consistent airflow produced by your CPU fan. The heat is moved out, and cooled air passes through the component, making it stay function all the time.
In some computers, the Fans run on the automated process where the RPM get auto-adjusted based on the system operation. When you are using the computer at its optimum capacity, the RPM starts to increase expelling the CPU’s hot air.
Your system stays in the moderated temperature, which makes it run entirely without creating an issue. The more you use the hardware, the more speed adds to the fan to keep the computer function all the time.
A fan reaches its extreme level when more airflow is to cool the component. While operating at a high level, the fan starts making a noise. The function to manage the fan speed is not readily available in the system.
People who have technical knowledge would know how to access the fan speed setting in the computer.
CPU fan control software
CPU fans are vital in keeping the computer hardware and software fully functional. However, the fan does not run on their own. The computer is a program to manage the fan setting and operate according to the computer’s requirement.
The motherboard controls the fan flow and adjusts the setting based on the core component’s temperature information. The motherboard regulates the performance of the whole computer, RAM, and processors.
Whenever it experiences a heating problem, the fan pushes its optimum power to produce more air in the component. The ideal temperature needs to be maintained in the computer system to avoid damaging the computer’s small parts and core functionality.
Usually, the number of fans attached to the CPU would vary depending on your usage. The high configuration computer device uses three fans in the PC.
Normally two fans are there in the back and the one in the front of the CPU. The heat sink fan and power supply fan does the primary cooling job as they are directly placed near the process and motherboard.
Their job is to expel the heat outside of the component and keep the cool air flowing inside. You can control each fan individually with the software controller and produce maximum results for your computer.
Photo by cottonbro from Pexels
Fan speed control software function
The fan speed control software provides you with the easy to access functionality to monitor your fan speed. In fact, it will be your ultimate solution to reduce the fan sound.
Once the software is installed on your computer, it automatically detects the number of fans that are installed on your PC. The individual fan control setting would be provided to you in order to manage the speed and airflow.
However, before you decide on downloading the software on your computer, consider some guidelines while choosing the fan control software. You first need to understand the type of software available in the market. Know your computer hardware setting and select the software that perfectly matches the setting.
The ideal fan control software must have fail-safe and custom curves with the temperature sensors setting functionality.
Fan control software also has a multiple sensor input detection facility that makes the monitoring easy. The software would detect the problem or the change in the airflow and indicates the users before it becomes a severe issue.
Normally, the noise in the fan would be detected using real-time monitoring. The software also tells which fan is causing the problem so that you can take the appropriate action against it.
Replacing the non-functioning fan would be quick when you know which fan is causing the trouble.
What is the Best fan control software?
The following guide will help you to select the best fan control software for your computer. Read the information carefully and decide which fan control software suits your need.
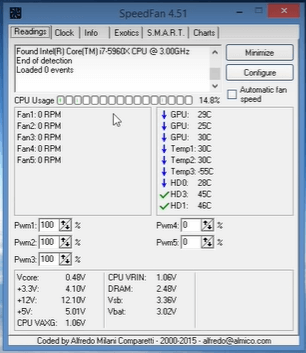
SpeedFan is automated software developed to monitor the fan speed and essential computer functionality to make your fan perform at its best performance all the time.
It scans and adjusts the fan speed according to the voltage, internal temperature, the heat outside the CPU, and many more. You can even track the temperature of your hard drive while operating the computer.
The software used the smart information to access the component data and displays it in the software setting. The SpeedFan is compatible with the SCSI drives.
Speedfan
You can change the FSB of the various hardware components. With the SpeedFan help, you can moderate the temperature in the system and alter the fan speed.
It is the best program to reduce the design’s noise level, making it reliable software for PC users.
Corsair is specially designed for the Corsair CPU fan. The users who use the brand CPU can easily connect the software with the Corsair fan and start using it instantly upon installation. It is a lightweight application that runs smoothly on windows applications.
The built-in features such as CPU temperature, hard drive disk temperature, CPU load, and fan speed can be monitored and adjusted using the Corsair link software.
Corsair Link
Even though they created this software for the Corsair, but it works fine with all kinds of CPU fans. The software automatically detects the fans and provides your access to the settings.
You do not need to have technical knowledge for operating the software.
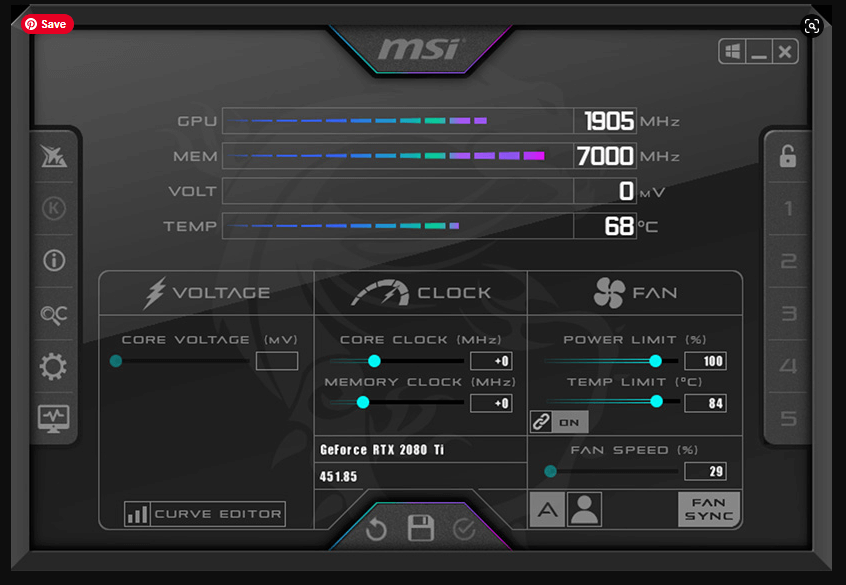
If you are enthusiastic about the advanced features that enable you to operate your computer at your fingertips, then the MSI afterburner is for you. It has users friendly backend system that looks awesome while working.
It comes with impressive features, including the CPU or GPU temperature monitoring, fan speed control panel, check current memory usage, GPU voltage consumption data, frequency, FPS, and many more.
All that you need to check while operating your computer is available in the application. The application has soundtrack recorded and received a great response from the users who have used the application on their computer.
MSI afterburner
It is the best software option to control your computer. You can push the limit of your computer to gain high-performance results at reducing power consumption.
MSI AfterBurner is a suitable application for people who do not want to get into technical details while managing their computer. They designed the simple-to-use interface for people who do not have much knowledge about the component and hardware.
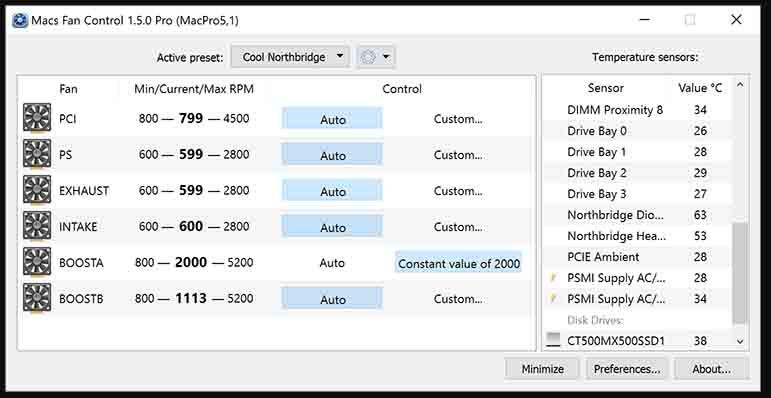
The Mac user can use the Mac Fan Control software on their IOS device. The interface of this program is simple to use and provides instant access to all your computer fans.
You can monitor the CPU temperature on the mac computer. Adjust the RPM of the fan. Take the RPM to the high or the low level according to the room temperature or the usage.
Macs Fan Control
The software is especially for the usage of MAC users. When you detect any noise in the CPU fan, go to the setting and check the cause of the noise.
The high temperature might be producing the noise. Reduce the computer’s functionality by closing some of the application on the computer or reducing the RPM to bypass the noise problem.
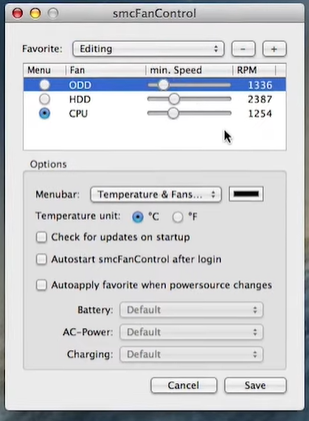
It is a free tool that you can download from the web and install on your windows pc. It alters the speed of your computer fan and CPU fan.
The software is compatible with the desktop as well as the laptop. In the computer, the built-in fan is set at low-frequency speed.
You can increase the fan’s RPM using the software and pass more air on the laptop while working on the high-end software or the graphic-rich application.
The slow fan speed sometimes causes the overheating problem. The application monitors the CPU temperature and alerts the users about the heating problem to immediately take action.
smcFanControl
The software offers a great solution to counter the issue and increase the minimum fan speed using built settings. For Mac users, the software would work smoothly and be a fantastic tool to have on your Mac computer.
Conclusion:
The PC fan control software provides an essential tool that makes your computer operation comfortable. You will have full control over your hardware and you can see the data of the fan in the system. The software tracks all the information and provides the required solution in one click. Activate the software and let it rest in the background.
Whenever it detects any trouble in the application’s core component, it will immediately alert you and provide the best solution to counteract the problem. You can drop the fan speed or inverse the setting to increase the RPM according to the device’s need. If you need to achieve full control of your hardware You should use the Fan control software. The software also helps you to increase the life span of your device.
Get your PC fan control software today to see the difference in your operation. It is built for everyone and provides fantastic solutions.
Spotify Wrapped 2019 is the most anticipated feature that has some glitch in it. Many users have reported that the elements are not working for them. The data that they were expecting in the Spotify Wrapped is not available.
Year-end is the time when the user waits for the review of their yearly stats and streaming data. People want to know what they have listened to this year, the songs they like the most, and the album that put busy throughout the year.
Their favorite artist and some other important that are missing because Spotify wrapped 2019 is not working.
Listen favorite music on Spotify
Users asking on Spotify wrapped 2019 not working
Many users have got the the similar problem Spotify wrapped 2019 not working issue. Anyway when you are paying a
How to fix Spotify wrapped 2019 not working problem?
People have started reporting the issue to the support team. Some users have posted the problem on social media sites claiming they can see the top songs list but not seeing other features.
People are frustrated with the situation as they all are paid users, and still, they do not have access to the essential elements.
The people closely connected to Spotify think the issue is with the large volume of users visiting the page simultaneously. The server of Spotify is not designed to handle large quantities at the time, making the feature not able to load the data.
Generally, Spotify releases the Wrapped list globally. The users from all around the world visit the page simultaneously as they immediately get the notification in the app. This may lead to server downtime in many countries, and users cannot access the data.
It would help if you waited for a while until the traffic goes down. Try after some time and see if you can able to visit the page. You might be able to access all your statistics as usual. If the issue persists, you can contact the support team of Sportify and ask them for the cause of the problems.
Spotify wrapped 2019 | listen your favorite music
The Spotify year’s solution in review 2019 wrapped not working address by the Support team member of the Spotify on the forum.
Follow these step by step guide and see it solves Spotify wrapped 2019 not working problem.
1) The web browser installed on your device must be of the latest version. Check for the update and reinstall it before you access the Spotify Wrapped 2019.
2) If the web browser doesn’t work, then try using another browser or device. Log in to your Spotify account on the other device and check whether the Wrapped 2019 list is accessible.
3) Another solution is to visit Wrapped Hub in the app. You can get this setting by searching in the app.
App issues:
1) You should reinstall the new version of the application on your device. Delete the existing Spotify app and download the application from the app store.
2) Alternatively, restart the app again and see if the issue resolves.
3) Login or logout to the application to clean the cache and regenerate the entries in the app. Login will reconnect the app with the server and provide you the data instantly.
The best songs of 2020 on Spotify
However The Spotify customer service account on twitter(@Spotifycares) replied to one user that she should try to open the feature in an incognito internet browser.
Hi Helen! Can you try opening it in an incognito window? Send us also a DM with your account's email address. We'll check this out /LI https://t.co/ldFdZRiNAt
Spotify music streaming app is known for the worldwide collection of great music. It tries to lure its users with an extraordinary personalized music listening experience.
Since the Launch of Spotify wrapped, the users have become connected to this feature. The Spotify wrapped is design to track the user’s behavior and accumulate the data throughout the year. It checks the popular songs and artists in your playlist that you have listened to most often.
The Spotify intelligent software tracks your activity and creates the analytical report, which is then presented as the Spotify Wrapped at the end of each year. If you are a Spotify user and regularly use the application, you will also start receiving the wrapped list every year.
It is always fun to check what you have listened to this year. The artist you follow might be unknown to you. Spotify provides more information about your favorite artist and gives you a chance to connect with more songs sung by the artist.
Spotify on mobile
The type of songs you listen also tracked and a similar playlist is recommended to enjoy the new collection next year.
Spotify Wrapped also considers the time you spend listening to the songs. Hence, you can see you’re analytic in your Spotify account and check how was your journey throughout the year. The system breakdowns the music you listened into a specific genre-fluid.
It will arrange the playlist by the top genre to the least used genre based on the recorded data. This will tell you what kind of songs you are inclined to. The wrapped has extended to the other features as well that include the podcasts. It gives you inside data of the artist and the popular playlist year as per the listening habit.
How to get Spotify Wrapped 2019
You can also see this video and get a clear idea on how to get spotify wrapped 2019.
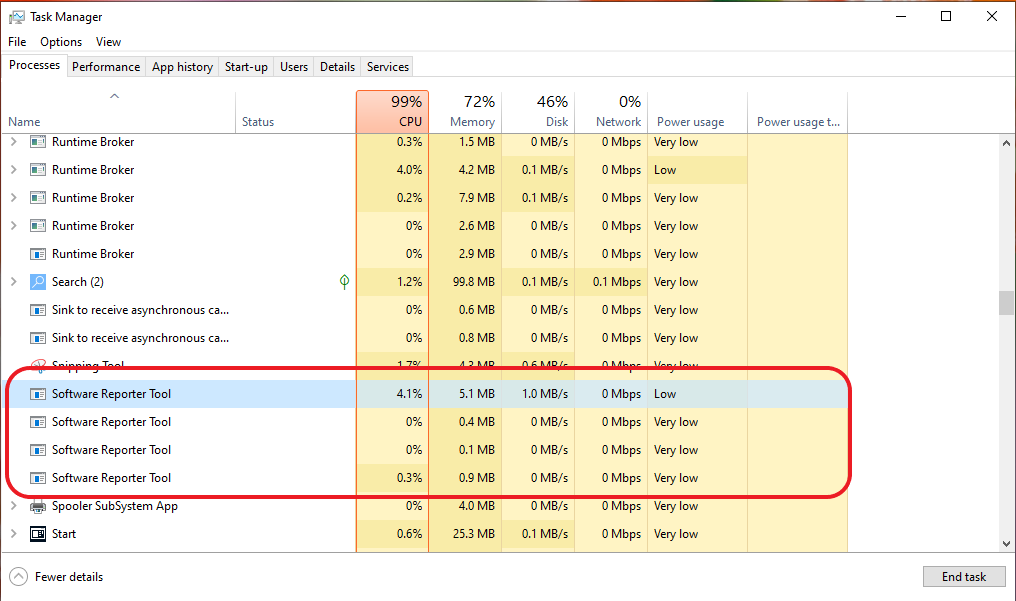
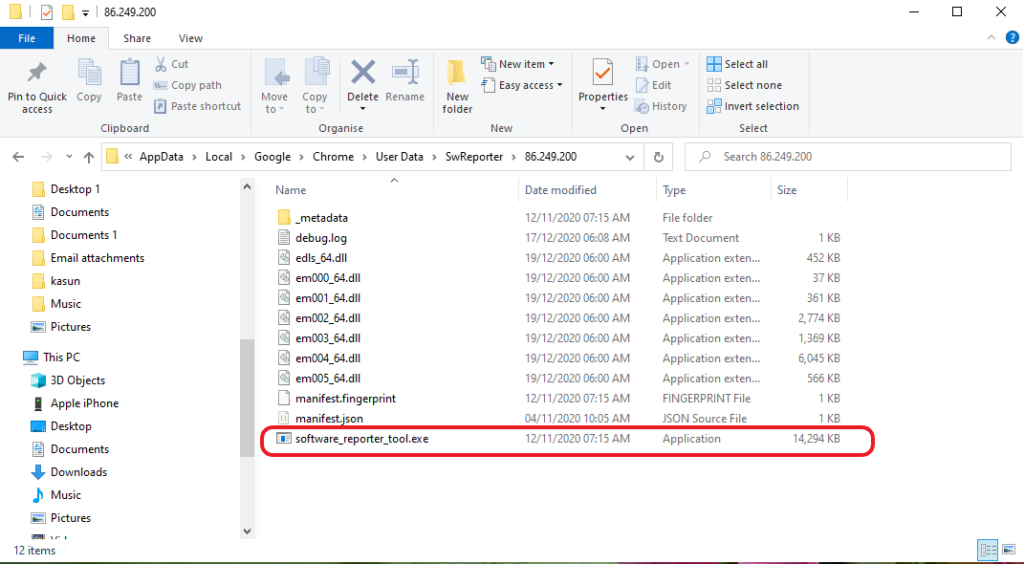
Suppose you discovered a particular process or a program running with the name “Software Reporter Tool.exe” in Task Manager that causes massive CPU/disk use, and you believe what it is doing on your computer. In that case, this article will prove to be very helpful.
What is the use of the Software Reporter Tool? We’ll tell you in this article. How did it get mounted on your device? Is this safe, or is it too suspicious? On your PC, what does it do? What are the advantages and disadvantages of having this executable run in the background? How to disable or delete it from your computer?
What is the Software reporter tool?
If you are wondering what the software reporter tool is, then here is the answer. In Google Chrome, the Software Reporter Tool is a distinct mechanism that monitors the installation of Chrome and informs whether any add-ons interfere with the browser’s usual operation. The tool is not connected to the internet, but the user mostly uses it to detect services that can interact.
Software reporter tool in Task manager
A 54Kb executable is available, named “software reporter tool.exe.” You may also want to disable or delete it if you are experiencing a high use of the CPU for this stage or if you always see a warning that the Google Chrome App Reporter Tool has quit functioning. It happens due to the software reporter tool’s high CPU.
The user is unaware of its presence until the user intentionally searches for software reporter resources. So the issue is what role does this Chrome add-on play? The Chrome software reporter tool is an executable file operating once a week and transmitting the scanned data to Chrome.
To be precise, the computer monitors the system to check for unauthorized software applications that can mess with the functionality of Chrome browsing. The tool also reports on unintended Chrome advertisements or crashes during events, such as site failures.
Where is the Software reporter tool located?
It is the executable file in the Chrome system data folder that exists as the Software reporter tool.exe. Details about the Chrome user profile, like device settings, bookmarks, passwords saved, and data about other users, are included in the Chrome app data folder.
Amongst this additional user info, the .exe tool is located in the Chrome system data folder under the SwReporter tab.
Software reporter tool in File explorer
Is it safe to use?
As a client, you may be cautious about privacy. If you are unsure about your network privacy, you can verify the tool’s validity by only heading to the .exe file. You will remember that Google digitally signs the section as the Chrome Cleanup Tool with the file definition.
This tool is completely safe. It is important to note that the reporting method has no network touch. The device’s only task is to report Chrome to apps that usually do not work with the Chrome browser.’
How it differs from the Chrome Cleanup Tool?
As per Google, this app reports the scanning to Chrome, and the Chrome browser advises the user to uninstall the malicious software using the Chrome cleanup tool based on the results scanned. While the tool helps remove obstacles that could harm the browser experience, many users are most worried about its massive use of CPUs when using the tool in the context.
The device will operate for around 20 minutes in the system, which might keep your certain operations back. It should be noted that unless you run third-party applications that are a challenge regularly, this tool might not have been a source of interference.
The function of the Software Reporter Tool
Google Chrome uses the executable chromeSoftware Reporter Tool to search the machine for malicious software, so it runs in the background. It also detects services that can cause Google Chrome layout problems. Please note that this Tool is not a malware or antivirus application.
Photo by Joël Super from Pexels
Google chrome’s software reporter tool scans and eliminates applications and plugins that can cause Google Chrome issues and prevent Chrome from running correctly, such as tab crashes, unknown homepage or search engines, etc. The executable windows 10 application runs once a week and audits your computer. Accomplishing the full scan can take up to 25 minutes.
Should You Allow Software_Reporter_Tool.exe to Run on Your Computer?
It’s dependent on you. Usually, with this tool, you really shouldn’t face any problems, and you must allow this tool to run on your computer as it shields users from malicious software and malware. But if you don’t want the device to report its results to Google, if it causes high Processor use on your computer, you can block it from operating on your computer.
Is it an antivirus?
To search your device for malicious applications, Google Chrome uses the executable Software Reporter Tool, which is why you see it going on in the background. It also detects applications that can cause problems with Google Chrome’s features. And yes, it is not an antivirus tool.
Why Does the Software Reporter Tool Use So Much CPU?
The process requires continued scanning where the CPU power is utilized at the optimum level. The disk scanning also consumes more data and ram, which directly leads to the CPU power consumption during the scan. Report tool software prioritizes the file scanning based on the core file to the ordinary file. The system files are scanned first to protect the core of the CPU then general files are selected for the scanning.
Overall the process may take 20 to 30 minutes to complete, depending on the number of files available on the computer. Due to the lengthy scanning process, it may interfere with the other operating software. Therefore, it is advisable to run this tool when you do not use your system for routine work. It may slow down your system.
Photo by Andrea Piacquadio from Pexels
How to Block the Software Reporter Tool?
Blocking access to the program can prevent Google from removing unwanted software from the system or warning you about it. You may use other applications, such as antivirus software, to delete threats or potentially unwanted software from the device, for example.
Although the entire folder’s contents can be removed or the executable file renamed itself, this only provides a temporary workaround. Google transfers the reporter software tool back to the system until the web browser is modified.
Software Reporter tool is neither a virus nor an antivirus. It is merely a tool available on computers. The function of this tool is to scan the computer, and the complete scan takes 20 minutes. As it uses too much CPU, people often prefer to disable it.
Conclusion:
It is useful to have the software reporter tool on your computer to avoid adware, scam files, viruses, and unexpected events from occurring on your personal computer.
If you are interested in reading more articles related to Google chrome you can refer here.
The Spooler Subsystem app is the windows application that supports the printing job on your computer. The application runs in the background when you initiate the printing process.
If you open the Task Manager, you will notice the system application name “spoolsv.exe” executed while printing. The application manages both printing and faxing facilities on windows computers.
In the first view, it may sound like a third-party application because of its name. You may think some virus may have got injected into your PC.
But do not worry. The application is a genuine windows application. It is fully secure and works seamlessly without affecting other applications of your computer.
spooler subsystem app
Why should you know the Spooler subsystem app?
Your personal computer connected to the printer sync the data and follows the instruction given by the users. When you try to print documents using the printer, the print spooler is activated and sends the printer’s message to handle the printing instruction.
In case the printer is busy printing another file, your document will be kept in the queue until the previous job is complete.
Printing configuration, settings, and fax job can be managed through the Spooler application. You will not perform the printing job if the spooler application is disabled on your computer. It is necessary to put the application in active mode for printing the document through your computer.
Spooler subsystem app high CPU usage
Spooler subsystem application only activated when you put the request for the printing. Usually, it will not consume much CPU power; however, that doesn’t mean you will never encounter the high CPU usage problem.
The memory used by the printing application is entirely depending on the number of printing application running in the background. If you have put many files for printing in the queue, then there are chances that the CPU may get consume a fair amount of memories.
spooler subsystem app
If you still find the problem with the small number of printing files, then there might be some issue with the application that needs to be analyzed before taking any further action on stopping it or deleting it from your computer.
One of the common problems that people have noticed that the CPU usage goes up when they start printing, and the windows get frozen. After that, you have to wait for a while until the window comes back to the regular operation.
In such a case, the problem might be with the printer attached to your computer. Your PC and the printer are not able to communicate easily. When the data is sync properly between your printer and computer, you will never experience the issue.
Try to reinstall the application again. See if the problem still exists. You can change your printer and try the same process by connecting your computer to a different printer. If you still encounter the same problem, then there will be an issue with your windows computer.
Something is blocking the process, or some software might require an upgrade. You can reinstall the application and install it back from the official Microsoft website.
Also, check for the windows update. Updating your windows to the latest available version would solve your problem.
In a situation where your computer is consuming more memories while running the Spooler subsystem app on your device, you should turn to the system update mode.
The first step in the process is to initiate the windows printing troubleshooter on your Windows 10 computer. You can find the setting in an upgrade & Security tab. Run the printer troubleshooter.
The windows application immediately diagnosis the printing software installed on your device. It checks whether any file is corrupt or requires an upgrade. The application will attempt to fix the problem automatically by updating the existing file to the latest version.
Once the process is complete, the system will notify you with the message letting you know that the files with a problem are updated.
Spoolsv exe spooler subsystem app
The Spoolsv Exe file is noticeable in the system process application or the task manager. You can open your taskbar after you activate your printing job. The application name Spoolsv Exe file will be visible at the top of the current task tab.
The Spoolsv Exe file indicates the printing job is in the process. You can check how much memory it is using and the CPU power consumed by the process.
Many users have reported that when they run the printing job on their computer, the Spoolsv Exe file reaches 100% CPU usages. The CPU consumption is average when you have multiple files in the printing process.
The laptop requires more memory to connect with the printing device and instruct the printer to print it. The back and forth communication with the printing device consumes more memory than a standard application.
You can close some of the applications that not in use before you start the printing job to avoid windows crash or freezing problem. The printer halts the process if it is not able to collect data from the computer.
Your computer must be fully functional during printing. A drop in the connectivity would stop the printing job. You may then have to start the process over again.
Whenever you see the name Spooler subsystem app on your Windows 10 computer, you should double-check the name and the end file. Many trojan applications and viruses try to simulate the application name and generate fake names to fool the users.
You might think it is a windows file, but it might be used by another application that is not part of the windows official files. The system might have compromise, and it may result in data leaks over the period.
If the spooler subsystem gets stopped, you will not print the document through your computer. You should use this method to check whether the running application is a simple Spooler app or a third-party application.
Stop the Spooler app for a while and check if the printing works. If it is still working, that means the file running on your computer is a virus. Delete the file from the control panel.
Spooler subsystem app location
Run the windows defender application to scan your computer for the virus. It will detect the file and remove it from the computer.
You should be aware that the Spooler app is the windows file. It will never appear in the start menu file. It always resides in the windows system32 folder. If you find the spooler in the start menu, then that is not the original file.
You should check the task manager regularly when you experience suspicious activity on your computer. The running application will tell you what is happening in the background.
Check on the following video to fix Spooler Subsystem App error.