First of all, make no mistake Google chrome is a reliable browser; no arguments there. It is very stable and hardly throws problems at the user. Having said that, sometimes you’ll experience Chrome keeps crashing, and it can be really frustrating when you are working with something important. But, there are simple solutions you can try to keep this issue at bay. Let’s discuss.
Chrome Keeps Crashing
Do these to stop Chrome keeps crashing
Close the unwanted tabs
You might think it’s only the tab you are currently working on Chrome is active, which is not. Chrome has a separate process for all the opened tabs, and you can inspect them via task manager on Windows or Mac’s activity monitor. So, the more opened tabs in the browser mean the more memory is consumed from memory. This is not ideal for a smooth Chrome operation.
In that sense, it would be better if you close the unused tabs and open a tab only when really required.
Update the SEP (Symantec End Point security)
If you are getting the “Oh Snap” message, the issue might not be with your chrome browser. Actually, it’s because the latest version of Google chrome is less compatible with old versions of End Point Security. If this is your situation, updating the End Point Security should prevent Chrome keeps crashing, saying, “Oh snap.”
Chrome Keeps Crashing
Start all over again
Yes, it is your computer, and you can open and work with any app you like. But, your computer’s RAM should have the capacity to serve all these applications. Programs and browsers such as Opera, Firefox, Skype, VPNs, and Chrome are some of the memory-consuming applications that you should try to limit opening spontaneously.
When Chrome keeps crashing, quit all these programs if they are opened on your computer and restart the Chrome to see the issue still persists. This does not necessarily suggest that any of those closed apps have anything to do with Google Chrome; it’s because of the space available of the RAM.
Update to the latest version
Outdated versions of Chrome have a tendency to get crashed more often than not, and if you want to have a stable Google chrome, you must update it to the latest available version. Updating Chrome isn’t the most challenging work of the world. In fact, when you quit and reopen Google chrome, it should be automatically updated to the latest version.
Chrome Keeps Crashing
If this doesn’t happen with your browser, you can update it manually without much of a fuss. To do this, you will have to open the chrome browser, go to “Help,” click “About Google Chrome,” and update. If you don’t see the ‘Update” button, it says you are running Chrome on the latest version. If not, you can visit Chrome and download the latest version of Google chrome in a couple of mouse clicks.
Check for malware
You can visit the security and search engine setting of Chrome to see whether they are at the state that you previously applied. If they are not, it tells you have downloaded something erroneous to your browser. In the meantime, you can clear the cookies and cache for “all times” to mitigate this issue as well. Erasing cookies and caches will also result in removing malicious codes that are causing problems to Chrome.
Chrome Keeps Crashing
Further, third-party programs like Malwarebytesalso are built to help you with this. A simple scan will reveal whether your browser infected with malware. So, yes, there are few methods available to try in terms of malware issues on Chrome.
Chrome extensions
Extensions are awesome, and they do tons of various unbelievable tasks to get the maximum out of the Google Chrome browser. But, the extensions also small software tools, and it suggests that they are vulnerable to malware attacks. Further, when using several extensions, one can cause issues to another and not work flawlessly at the same time. If Chrome keeps crashing time and again, the reason behind the issue can be one or a few problematic extensions that you downloaded.
However, we are not emphasizing you get rid of your favorite extension straight away to check whether it is the wrongdoer. Instead, disable the suspicious extensions and see if the issue is fixed. What you have to do is disable all the extensions and try executing the tabs that you opened before when Chrome got crashed. If you find no issue with poor extensions, enable them; the issue lies somewhere else.
Chrome Keeps Crashing
Uninstall Chrome and reinstall
Now, this is different from updating. If you have tried all the above steps and the issue still exists, you will have to uninstall and reinstall Chrome. There is nothing much to worry about uninstalling Chrome, and you can do it as you uninstall an ordinary app. Also, the reinstalling process is not a Himalayan task, and you can download Chrome by clicking here.
Firefox is the go-to browser of most people, and there are loads of justifiable reasons behind their selection. Actually, it is not the topic we are going to discuss today. Let’s focus on some solutions for Firefox not responding problem. Please read this article vigilantly, as we guarantee it will stop you from searching for Firefox alternatives!
firefox not responding
Is Firefox Not Responding? Try these
Check your internet connection
Obviously, before you do anything with your browser, check whether you have a stable and good internet connection on your computer. Slow internet connection does cause problems to the browsers, and it’s the same with Firefox as well. If you come across a good internet connection, the next thing you have to try is opening a different web browser.
Try using Google Chrome or Microsoft Internet Explorer to log in to a couple of websites. If they work fine, the issue is definitely with your Firefox browser. Let’s see what to do next.
In order to load content faster on the browser, Firefox uses the graphic processor of your computer. This process happens via a setting called “hardware acceleration.” By default, it is turned on, and you don’t have to do anything with this setting. However, we have seen that users turn this setting off as a solution to Firefox not responding problem.
Often this tiny little change can bring Firefox back to life. Here is how you turn off “Hardware acceleration.”
Click on the three lines at the right upper corner of the Firefox browser and click “options.” Then go to performance and uncheck the box that says “Use recommended performance settings.” Now you will see another option as “Use hardware acceleration when available.” Uncheck that box too and click the three lines again at the upper right corner and click on exit.
Reopen Firefox and see how the browser works now. If the issue came to an end, you would have to think about updating your computer’s graphic driver in order to prevent this from happening again.
firefox not responding
Updating graphic drivers
We think you can understand that graphic drivers do have a say on Firefox not responding issue by reading the above solution. In fact, updating drivers is an easy fix for most of the bugs on software programs; including Firefox. Our suggestion is that it would be ideal if you take a little time and update your graphic driver once in a while regularly to keep Firefox solid.
You can update the graphic driver manually and let it happen automatically as well. But, manually updating a driver is somewhat a hassling work as you have to find the correct driver on yourself using the internet. It does demand tech knowledge to a certain extent. However, you can easily stay away from this unwanted bother by applying the setting to update the drivers automatically.
firefox not responding
Extensions
Similar to Google Chrome, you have the luxury to add extensions to your Firefox browser as well. Nowadays, it’s a rarity to find a browser without added extensions. Outdated, malicious and issues in the developments of an extension can lead you to frozen browsers, and you will end up with the error of Firefox not responding.
If you are an extension lover who has tons of them on your browser, it can be a painstaking job to figure out which one is causing issues to Firefox. If so, you will have to disable all of them to see how the browser works without extensions. And enable one by one to identify the faulty program (extension). Moreover, try to stick with most-needed extensions to prevent lags on web browsers; be it Firefox, Google Chrome or any other.
firefox not responding
Try the latest version of Firefox
Updating the software to the latest version is a simple yet highly efficient method to deal with slow and troublesome programs; nothing different with Firefox. However, Firefox does this job automatically for you. But you always can update it to the newest version manually by visiting the “Help” section of Firefox.
After you click on the three lines in the upper right corner of the browser, you will see the “Help” option right at the bottom of the opened menu. Then, go to “About Firefox”, and Firefox will search for the latest available update. If found, it will apply the latest version; once the process gets completed, close the browser and re-launch.
firefox not responding
Clear the cookies and cache
If Firefox is overloaded with browsing data, it bound to cause issues while you use it. Clearing cache and cookies are not something to worry about in most cases. You can delete the cache and cookies by visiting privacy and security. Check both the boxes for cookies and cache and hit the clear button; simple as that. Then reopen Firefox and see whether the Firefox not responding has been sorted.
Is your MacBook camera not working? We know how frustrating it is to be in this situation. However, it doesn’t necessarily suggest that you need a professional to fix this issue. You can try some of the troubleshooting methods on your own before you opt for such a service. Let’s dive in without further ado and see what you can do if you are experiencing this issue with your MacBook.
Is your MacBook camera not working? Here are the solutions
Go through privacy preference settings
Mac doesn’t permit access to the camera straightaway for the third-party programs in order to protect your privacy. So, you will have to allow it manually by clicking the pop-up message when you open the program for the first time. However, you can do the same thing by visiting privacy preference settings as well.
MacBook Camera not working
This is how to do it.
From Apple menu -> system preferences -> security and privacy -> privacy -> select your MacBook’s camera. Now click the program you want to use the camera with; if prompted, enter the administrator password to confirm your action.
Restart the computer
Restarting computers often fixes most of the issues, and nothing different in this scenario as well. Before you reboot the Mac, make sure you are not trying to work with two programs simultaneously that ask for camera access; because Mac doesn’t allow camera access to two similar programs at the same time.
You can easily close the running programs via the activity monitor. Click hereto see how to open the activity monitor (the taskbar of Mac). Reopen the program and give it another shot to see whether the camera is working. If the issue still exists, restart the Mac.
MacBook Camera not working
Update the app and MacOS
Maybe it’s bugs in the MacOS and the related app causing issues on the camera. If that is the case, you can mitigate the problem by downloading and installing the latest versions of the two.
To update the macOS, visit System Preference and click Software Update. You will have to go to the developers’ website to check on the latest update of the app if you have downloaded the program outside App Store.
Try a different user account
Yes, this deserves a try. Sign out from the existing user account and use a different account on the MacBook and see whether you can access the camera. We have seen positive results with this step; if it fixes your problem, you will have to transfer the data to the new account.
If you don’t have a different user account, follow the below steps to create one.
System Preference -> Users and Croups -> add
MacBook Camera not working
Switch to Safe Mode and check
It’s the same as Windows. You can fix numerous painstaking problems by switching to safe mode, including the issue of MacBook camera not working. To enter the safe mode, first, you will have to shut down the Mac (Apple -> Shut down). Now press the power on button and press and hold the Shift button immediately when the Mac gets started. You will see an option to log in to the safe mode on the screen and click on it.
See whether the camera is working properly or not. If it works, log out from the safe mode and log in to the normal mode to access the camera.
Reinstall the MacOS
Now, this may sound outrageous for most, but reinstalling MacOS tends to fix most of the software-related problems. Also, you can reinstall the MacOS without causing any losses to your personal data. That said, it would be best to back up the data before you try this step as it will keep your important data safe if something goes terribly wrong.
Follow the below steps to reinstall MacOS
First, shut down the computer. Then press the power on button, now press and hold Cmd + R immediately to boot the MacBook into recovery mode. Go to MacOS utilities and click the reinstall MacOS option; from there onwards, follow the easy instructions to reinstall MacOS.
MacBook Camera not working
The time of reinstalling process heavily depends on the power of your internet connection. It may take up to two hours; so, be patient and concentrate on another thing!
Use Apple Diagnostics
Your MacBook has built-in software to diagnose issues on its hardware. Apple diagnostics will tell you why your camera is not working. However, if you come across any hardware issue on your camera, you will have to take your MacBook to a professional to fix it. Yes, of course, you have the luxury of contacting the Apple support team to book a repair as well.
Conclusion
We hope you don’t have to use our last suggestion to check why is MacBook camera not working? We really do. So, guys, did our solutions help you? Please take a second and let us know how you fixed your issue. Have a great day!
For more details watch the following video on YouTube.
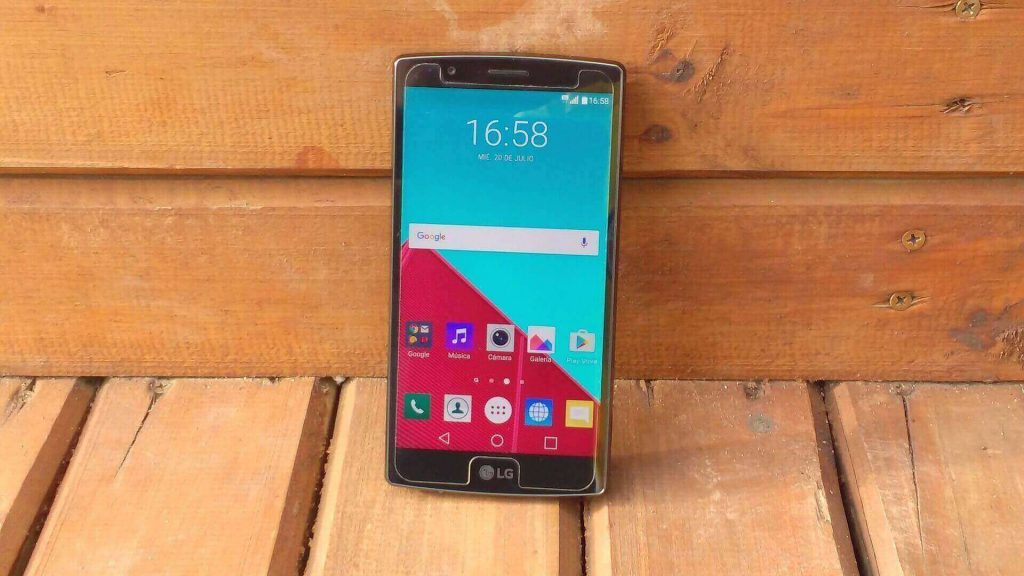
As we know we come across different situations where we need to do some stuff on mobile that cannot be done with settings. So we need some USSD codes that are named secret codes. Here we discuss secret codes for LG mobile phones.
So you all know how to use USSD codes. For ones who don’t know let’s start from how to use USSD codes.
How to use USSD Codes
Open the Call app of your mobile.
Simply dial the USSD codes in the call app and make a call.
Normally USSD codes starts with *, # and *#.
Secret Codes for LG Mobile Phones
Code
Description
*#*#2664#*#*
Touch Screen test
*#*#0289#*#*
Device Audio test
*#*#4636#*#*
Display all the information about the Phone, Battery, and Usage statistics
*#*#3264#*#*
to check the Ram version
*#06#
Displays IMEI number
*#*#232338#*#*
Displays Wi-Fi Mac-address
*#*#7780#*#*
Reset the device. Erase all device data. eg:- photos, apps, and settings, etc.
*#*#64663#*#*
QC Test – (All tests)
*#000000#
LG’s Service Menu
###337*07#
master reset the LG device when the sim card is inserted.
Secret Codes for LG Mobile Phones
Hardware Test & Software Info Secret Codes for LG Mobile Phones
Code
Description
*#*#1472365#*#*
Quick GPS Test
*#*#1575#*#*
A Different Type GPS Test
*#*#0*#*#*
Android Device LCD display test
*#*#0842#*#*
Vibration and Backlight test
*#*#2664#*#*
Android Device Touch-Screen test
*#*#0588#*#*
Proximity sensor test
*#*#7262626#*#*
Device Field test
*#*#232339#*#*
Device Wireless Lan Test
*#*#526#*#*
Device Wireless Lan Test
*#*#0289#*#*
Device Audio test
*#*#0673#*#*
Device Audio test
*#*#232331#*#*
Device Bluetooth test
*#*#0283#*#*
Packet Loopback test
*#*#4636#*#*
Display all the information about the Phone, Battery, and Usage statistics
*#*#34971539#*#*
Shows all information about the device camera
*#*#2663#*#*
displays a touch-screen version of the device
*#*#3264#*#*
Android Device Ram version*#06# Displays IMEI number
*#*#232337#*#
Displays Bluetooth device address
*#*#232338#*#*
Displays Wi-Fi Mac-address
*#*#1234#*#*
PDA and Device firmware info
*#*#1111#*#*
FTA Software version
*#*#2222#*#*
FTA Hardware version
*#*#44336#*#*
Displays Build time and change list number
Hardware Test & Software Info Secret Codes for LG Mobile Phones
Backup & Reset Secret Codes for LG Mobile Phones
Code
Description
*#*#7780#*#*
Reset the device. Erase all device data. eg:- photos, apps, and settings, etc.
*2767*3855#
Format all device data and reinstall the firmware of the android device.
*#*#273283*255*663282*#*#*
backup all media files
Backup & Reset Secret Codes for LG Mobile Phones
Other Secret Codes for LG Mobile Phones
Codes
Description
*#*#7594#*#*
Changing the power button behavior – you can enable direct power off once you try this code
*#*#8255#*#*
For Google Talk service monitoring
*#*#8351#*#*
Enables voice dialing logging mode
*#*#8350#*#*
Disables voice dialing logging mode
##778 (+call)
Brings up Epst menu
*#*#197328640#*#*
Enabling test mode for service activity
*#*#4986*2650468#*#*
PDA, Phone, Hardware, RF Call Date firmware information
*#*#64663#*#*
QC test
*#*#225#*#*
Calendar
*#*#426#*#*
Google Play services
*#*#759#*#*
Rlz Debug Ul
Other Secret Codes for LG Mobile Phones
Codes to get Firmware version information Secret Codes for LG Mobile Phones
USSD Codes
Description
##49862650468##*
PDA, Phone, H/W, RFCallDate
##1234## OR #1234#
PDA and Phone firmware information
*##1111##
FTA SW Version (1234 in the same code will give PDA and firmware version)
#12580369#
Software and hardware info
#9090#
Diagnostic configuration in LG Mobile
*##2222##
FTA HW Version
##44336##
PDA, Phone, CSC
Codes to get Firmware version information Secret Codes for LG Mobile Phones
WLAN, GPS and Bluetooth Test Secret Codes for LG Mobile Phones
USSD Codes
Description
##232339## OR ##526## OR ##528##
WLAN test
##232338##
Shows WiFi MAC address
WLAN, GPS and Bluetooth Test Secret Codes for LG Mobile Phones
Codes to launch various Factory Secret Codes for LG Mobile Phones
USSD Codes
Description
##0283##
Packet Loopback
##0##*
LCD display test
##0673## OR ##0289##
Melody test
##0842##
Device test (Vibration test and BackLight test)
##2663##
Touch screen version LG Mobile
##2664##
Touch screen test
##0588##
Proximity sensor test
##3264##
RAM version LG Mobile
Codes to launch various Factory Secret Codes for LG Mobile Phones
GSM codes for LG Mobile
USSD Codes
Description
** 04 *
Change PIN1
** 042 *
Change PIN2
** 05 *
Unlock SIM-card (PIN)
** 052 *
Unlock SIM-card (PIN2)
GSM codes for LG Mobile
What is PIN code?
This stands for Personal Identification Number. As you have passwords protecting the PCs, Laptops or other documents mobile devices do have a password or PIN saving the device from unauthorized access from other people. It is a numeric code with 4 or 6 digits that needs to be entered when the device is getting started (unless the PIN security feature is turned off).
What is PUK code?
Personal Unblocking Key which is shortened as The PUK (Personal Unblocking Key) is a code consisting of 8 digits. It is basically used to unblock your SIM card when you entered 3 times the wrong PIN code. A card that is blocked by the PUK code cannot be unblocked. It cannot be used any further and you need to replace it.
Here when using these secret codes for LG mobile phone you have to follow the next steps as follows
Change PIN1 – after entering the code enter the PIN old, and twice a new PIN.
Change PIN2 – after entering the code enter the old The PIN2, and twice the new PIN2.
Unlock SIM-card (PIN) – after entering the code enter the PUK and new PIN twice.
Unlock SIM-card (PIN2) – after entering the code enter the PUK2 and new PIN2 twice.
Call Forwarding Secret Codes for LG Mobile Phones (you have to order the service from the operator)
iTunes is one of the best applications of Apple Inc. The software enables the IOS device users to transfer the music, TV shows, movies, and other media files securely between devices.
The iTunes software works seamlessly, and it provides a fast data transfer facility. There are many other features that you can enjoy using iTunes.
Download and listen to your favorite music, save your files in your phone’s backup, manage your IOS device, and many more. iTunes is the one-stop solution developed to manage all digital files securely.
iTunes alternative
The growing popularity of the iTunes software has given birth to innovation. Developers worldwide are working on an application that does the same job as iTunes software but comes with more advanced features that you cannot find in iTunes.
Today you can find many iTunes alternatives on the web facilitating the IOS users an excellent media management service.
What different would iTunes alternative software do for you?
1) Support multiple devices as well as the operating system. You can run the alternative software on Mac, Windows, and Linux operating systems without compatibility issues.
2) Instant access to the data stored on the computer using the iTunes alternative software.
3) Getting rid of IOS backups. Every time you connect the IOS device to iTunes, it creates a backup file. It is the default function of iTunes, so you cannot resist it.
iTunes alternative
The iTunes alternative software gives complete freedom to the users to choose the backup option. Either you stop the backup or activate it as per your requirement.
Here is the list of the best alternative to iTunes software
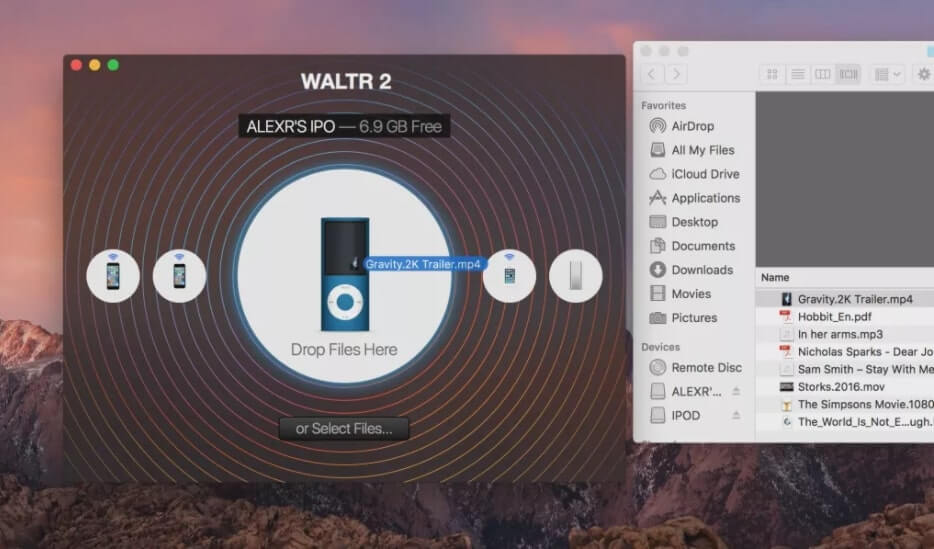
WALTR 2 is the most popular iTunes alternative software available in the market. It is available for both mac and windows pc.
The free trial version supports a wide range of IOS devices. There are some additional features that you can enjoy in the premium version of the WALTR 2 software.
Connecting your phone to WALTR 2 is quite simple. Use a cable or WIFI connection to access the data on your phone. The speed of data transfer is quite fast. It would help you to move data from one device to another or take backup quickly. WALTR 2 support all kinds of files, so there will be no restriction on what file you can transfer on your device.
Yet another alternative to iTunes software offering a wide range of services to iOS users. Now manage your file using the best file management application.
Connect your device instantly using the MusicBee and transfer your music files, videos to the smartphone. The application is available for Windows users as well.
Connect your smartphone and sync the file instantly between your windows PC and IOS devices.
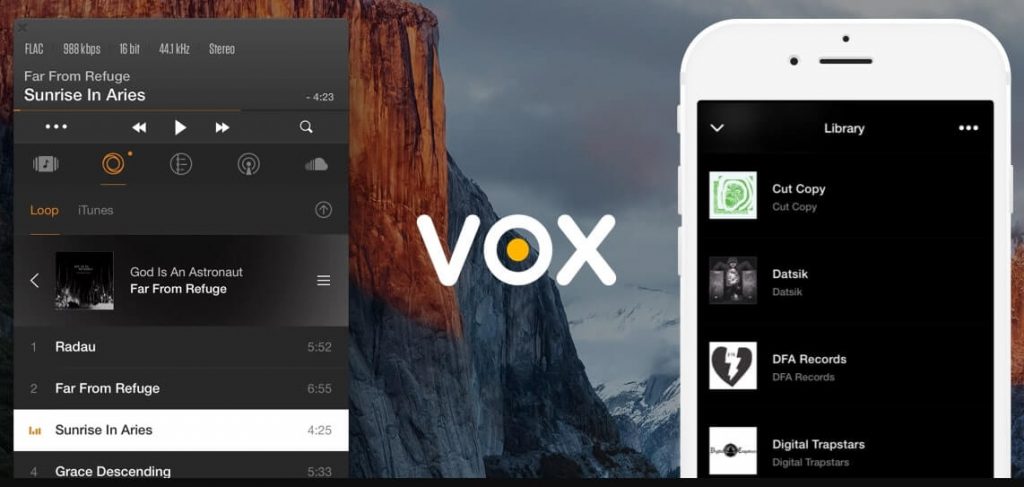
Vox media player is more advance among the other alternatives of iTunes. It comes with various new features that you cannot find in other software.
Simple looking software with the added benefits would make you spend more time accessing your file in the software. Support to the multiple audio file formats is one of the appreciated features of the Vox Media Player.
You can download and access the MP3, MP4, APE, M4A, FLAC, CUE, etc., audio file using the Vox Media Player.
Additionally, Vox facilitates personal music library support with streaming music via SoundCloud and Youtube.
Play more than 30000 internet radio stations using the Vox Media Player. If we talk about the features, the gapless playback is another outstanding achievement in the software.
The clear stereo sound, a bass audio engine with a cloud storage solution makes music listening fun. Vox Media Player ranks in the top position in many ways when deciding which iTunes alternative is best for transferring the files on an IOS device.
Transfer your music, photos, videos using the WinX MediaTrans instantly. WinX MediaTrans is a highly secure application that protects your file from virus attack or data breach.
The application now connects to your iPhone or iPads and provides seamless service. Automated your photo backup process to avoid manually save the files from the smartphone device to the computer.
Moreover, music management becomes comfortable with the two-way music transfer facility offered by WinX MediaTrans. Transfer video files, organize your books, use a ringtone maker, and many other advanced features are provided to you.
iTunes alternative
You also have the option to encrypt your photos and video library to restrict third party access. It protects your data from being steal from your computer.
Connect your device to the computer and open the WinX MediaTrans application to begin the syncing process.
You do not have to install iTunes on your system. The application works independently, and it gives more flexibility to the users.
The WinX MediaTrans is filled with essential features. Once it’s downloaded on your computer, you will be able to transfer any number of files back and forth using the software. It is one of the great windows application available in the industry.
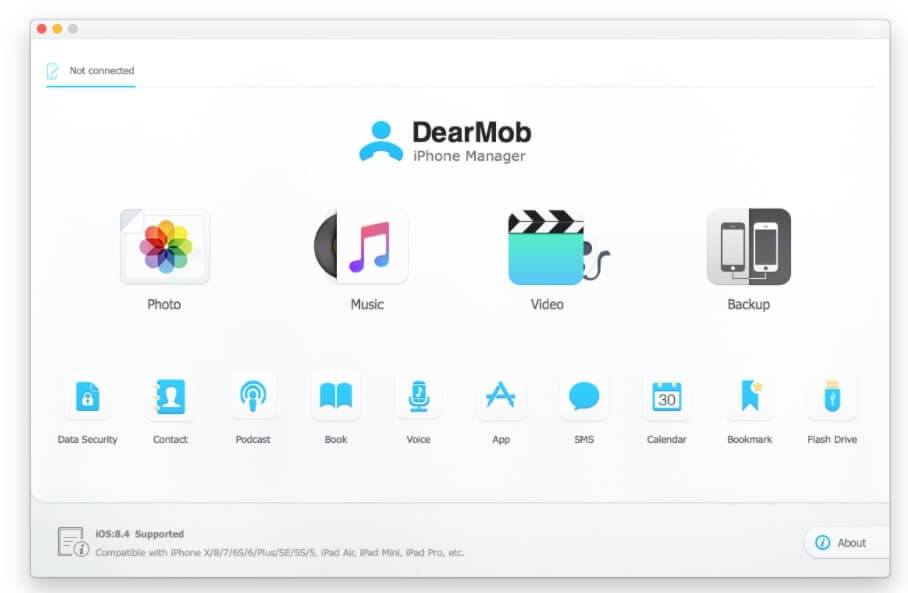
If you are looking for all one tool to manage your photos and music file on the iOS device, then DearMob iPhone Manager would give you require the facility to do that.
It will let you manage your media and music files and transfer the files between your PC and smartphone. Also, use the auto backup features to save your file without any trouble.
Data encryption facility is also given to you, making the data storage more comfortable. All the iTunes features are available in the DearMob iPhone Manager software, so you will not miss any of iTunes’ features.
Simple to use user interface is the heart of the software. You will experience ease while operating the application. Everything is accessible from the home screen.
Photo management is one of the features that users of the DearMob iPhone Manager have appreciated. It is unique in itself, giving you the freedom to manage it as per your need.
No matter what operating system you are using on your desktop computer, the application is compatible with your windows and MAC pc.
Install the software on your computer and connect your device using cable or the WIFI connection. DearMob iPhone Manager will automatically detect the connected device and start collecting the data.
Audio management is another feature that is useful in managing your songs. Use the Find box to search for the music in the library. The application arranges the song for you, so you do not have to manage it manually.
Musique is a music player that gives you a great experience while listening to music. Clean and simple to use UI brings joy to music management and transfer. All the features in the application are one click away, making it more reliable software.
The most favourite features of the users are its built-in lyrics finder. You get to extract the song’s lyrics in the application.
Play the song with the lyrics and enjoy your entertainment time. The players have the auto process that organizes the music file based on the artist’s name and albums.
It beautifully arranges the song in a separate folder that makes the songs more enjoyable. Next time when you access the file, you would not like to search or find the songs. The folder will put the album cover on it, which looks more organized folder.
The best user interface makes the application fun to operate.
The application has a built-in application that makes the music auto organize by artists and albums.
The music player works seamlessly, making it the more reliable application of all time.
The singer would like the features where the application searches the lyrics for you. The built-in lyrics finder makes it possible to download and access the new song’s lyrics instantly.
Cons:
The lyrics have a limited library, so you may not find lyrics of some songs added recently.
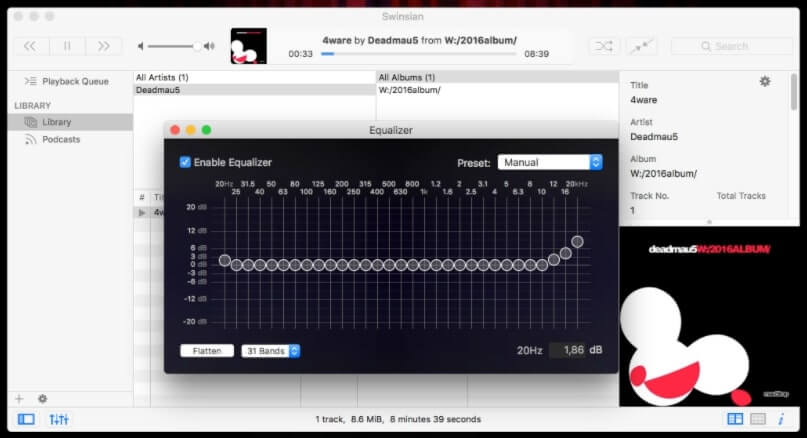
Swinsian has incredible features that make the app stand out in the crowd. It supports side varieties of the music formats.
You also get to use various other features such as tag editing, duplicate file finder, smart playlist, and many more. The application organizes all your music files in a separate folder giving you the advantage to listen to the songs based on your mood.
The duplicate finder allows removing the duplicate files that may consume your storage. Fast data processing makes the app more reliable.
No matter how big the library is, you will be able to access the large file without lag or slow down the application. You can customize the interface that can be changed as per your requirements.
You also get to add many widgets that customize the application with new features. You can control the music using the playback method in the small windows.
You do not need to keep your entire application open in front of you while playing the songs. The user who shifts their operation from iTunes appreciates the new user interface.
The software allows you to import your library in one click. If you are looking for a simple music play that does a similar operation to iTunes, then the application is excellent to use.
Comprehensive music format support gives you much-needed access to the extensive music library.
Take advantage of the tag editing features.
Use the folder watching makes the use of the application more fun.
It facilitates the user to import the entire music library.
Cons:
The user who first moves their operation from iTunes to the Swinsian may find it hard to learn the user’s interface. However, once you spend some time with the software, you will be more comfortable using it.
iTunes is a great app, but the available alternative application is much more advance in processing data. You will create backup files, erase data on your phone permanently, make the folder, arrange files neatly, online access applications such as SoundCloud and Youtube.
You can also report the files, recover the deleted data, transfer the heavy file from your iPhone to the desktop using the app. Interact with the messages, contact, and other important files.
The built-in repair script function would make the bug fixing easy. If there is an issue with the application in the iOS or the software itself, the application would detect the problem and repair the file instantly.
During the bootup process, the application checks the files and confirm everything is working fine. If there is no problem in the application it runs smoothly, if it detects missing file or corrupt files, the application connects it with the internet and download the required files.
Data recovery software makes your lost file searchable and gets the file back to its normal condition.
It is common to lose the critical file on the device. The inbuild recovery software would make the process easy for you. The premium account gives you a bonus with the application.
When it comes to the quality of the music, the Fidelia music player does an extraordinary job. The application enhances the music file to its highest possible quality giving the user a more comfortable listening ability.
The app is designed for those who do not like to compromise quality while listening to music. It is a high-definition audio player that supports a wide range of music file format and supports many online streaming sites. Elegant interface design gives more focus execution and an exclusive music list at your service.
Support all types of audio file formats, so you do not have to compromise the audio quality.
No doubt the music player is capable of playing high definition audio player.
Application support 64-bit audio unit plugins.
Cons:
The library windows a little cluttered. It is hard to find the music file or search them in the library if it is not arranged correctly.
iTunes alternative comparison and why you need them?
iTunes is an undisputed best application Apple has developed for its users. It is free and does a great job managing media files such as photos, videos, and music files.
With seamless features and simple to use user interface, iTunes perform perfectly fine in the growing competition.
iTunes alternative
However, the users demand the more service what making the software developer produce new types of application that works the same as iTunes, but comes with added features.
The new iTunes software is more reliable, users friendly and provides much more advanced features that you cannot find in iTunes. The growing supply of the innovative media player gives you much need benefits while using the application.
Where iTunes development takes years to get new features, the alternative applications are updated frequently.
You would enjoy the new features in the iTunes alternative software. The improved sound quality in the alternative software would amaze you.
Media players are capable of running a wide range of audio files. Where iTunes only support a few formats limiting your exposure to the new type of media format. The iTunes alternative software enhances the music file’s sound quality, giving you a better music experience.
The iTunes alternative software is design to save your time and money. You would be able to arrange your database easily in the alternative software. The straightforward user interface makes the data finding easy.
Additionally, Third-party service integration is possible in the alternative software. Some application comes on the online music streaming facilities, Soundcloud integration, Youtube streaming, and many more can be done using the iTunes alternative software. You cannot use third party application in iTunes.
iTunes alternative
It limits access to the large ecosystem of the music industry, which is available on the web. iTunes alternative application brings all kinds of entertainment to the centralized system.
You can listen to songs online, download them, watch the youtube video, and enjoy your entertainment time on-demand service. It becomes easy to download the songs from various music streaming sites and transfer the file to your iPhone and iPad.
Disadvantage of iTunes
Cannot merge more than one account: The most significant disadvantage of using iTunes is you cannot combine more than one account to sync the file.
The third-party application gives you the freedom to connect as many applications as you want and enjoy the data transfer seamlessly.
You can sync all your media libraries in one go. Apple does not support all the users to tie the multiple accounts on a single login.
iTunes alternative
Performance: The slow performance of iTunes makes people crazy while using it. The data transfer takes a hell of a lot of time. Many users have reported that small-sized file transfers from your iPhone to the desktop computer take several hours.
The problem persists, and Apple is not doing anything to solve this problem. Especially when you are connected through a Windows computer, the data transfer becomes slow.
Also, iTunes uses a fair amount of system RAM to run the process. You cannot multitask while using iTunes on your Windows computer. Some users believe iTunes has a compatibility issue.
Conclusion:
iTunes application is the best in class software to develop by Apple. It has basic features but still does an excellent job in the management of the files.
The new application’s need arises when you look for more advanced features that you cannot find on iTunes.
iTunes alternative
The iTunes developer has kept minimizing features to avoid clutter in the software. Compared to iTunes, the application available in the market that provides similar features would give you many new features.
You will be able to do much more with iTunes alternative software and make your entertainment time more enjoyable.
Moreover, iTunes developers are not adding new features to it. Alternative software gives more benefits to the users. Some alternatives charge the monthly fees in the subscription model where the user pays for getting premium services.
You will have a great time using the iTunes alternative application.
The full-screen feature is different on the Mac and Windows PC. Use the procedure based on the Operating system that you have on your computer.
How to go full screen Chrome on a Windows PC?
1) Open the Google Chrome PC Browser on your desktop or laptop.
2) There are two options to make your browser turn to full-screen mode.
The first one is to use the F11 key located on the top line of access to a keyboard. Once the F11 is press, the window will automatically turn to full-screen mode.
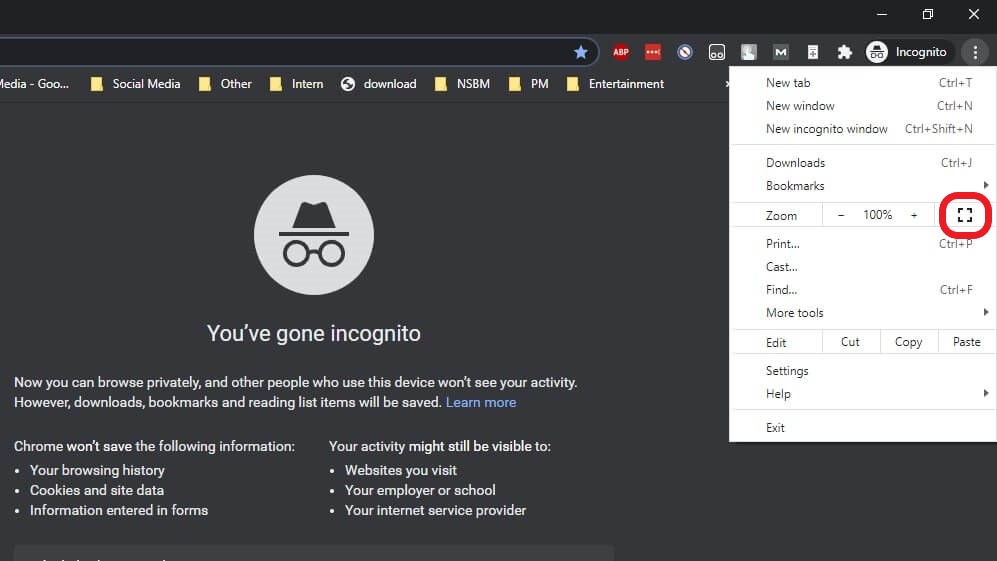
Another solution is to click on the three vertical dots available on the right-hand side top corner. Now the dropdown feature will open.
From the dropdown options, see the small Square in the list. It is available right next to the zoom option. When you click the Square, the window will turn to full-screen mode instantly.
How to go full screen Chrome on an iMac Laptop or desktop?
1) Go to the Google Chrome window.
2) Similar to the Windows pc, click on the vertical dots and open the dropdown menu. Click the Square to make the tab turn to full-screen mode.
full screen chrome
3) You can also use the green dot located at the very top left corner of the Chrome window.
In many Mac applications, the button is visible. When clicking the green button, the screen automatically covers the entire screen giving you a full-screen window to work.
How to exit full screen chrome?
Once your task is done, you can exit the full-screen window only by clicking the green dot again in the iMac, and it will shrink down to the standard window size.
You may have to hold the mouse cursor to the top section to appear where you can click the green dot again to instruct the iMac to go back to the normal mode.
Another way is using the shortcut key to turn the window to normal mode. Click command control + command + F to exit the full-screen mode.
On the Windows computer, move your mouse cursor to the top center of the screen. The close button will appear, click on it, and your full-screen window will turn to the standard size.
exit full screen chrome
Why you need Google chrome full screen?
Full-screen chrome function is necessary when you are dealing with the video files. In some cases, when you have media files that need more space to view the details, it is better to turn the small window of Google Chrome to the full-screen size monitor.
Google chrome full screen features also allow users to eliminate distractions while accessing the web.
You can hide the other tabs and secure information while accessing the information on the web. Imagine you are in a conference meeting with your client.
You would be giving presented online. There will be a situation when you want to access your laptop to show files saved on the computer.
In such a situation, you might not like to display your persona files present on the desktop. You can use the chrome full-screen shortcut to hide the desktop and turn the browser window to the full-screen mode.
Once you activate the full screen, the taskbar also goes behind the full-screen tab hiding all the taskbar’s pinned applications.
full screen chrome
Conclusion:
The full-screen mode of Google Chrome is a handy feature for readers. You can turn your browser window to full-screen mode when you are reading the article online.
Avoid any distraction while reading that appears every few seconds on your computer. The full-screen mode hides all the applications, notifications, popup, etc.
Use the full-screen mode in your time to stay focus on a specific task.
Autoplay audio and video on the website is becoming more popular these days. Website owners are trying to gain attention by showing the video clip or the background music as soon as the user lands on the page. With more websites using autoplay features, background audio becomes annoying.
Imagine you are in a conference meeting and you want to access the web to find specific information.
You open the tab, and suddenly some music starts playing in the background. It would be an embarrassing situation for you.
mute tab chrome
The biggest problem with the audio or video is finding the stop button on the page would take a few minutes. The media file might be somewhere in the middle of the page or the bottom of the page playing the audio. It would be difficult to stop the video instantly.
It is a good time to know the mute options that will help you disable the Google Chrome browser feature. When you visit the website next time, the tab will stay in silent mode until you permit to play the audio.
Let’s find out how to mute a tab on Chrome.
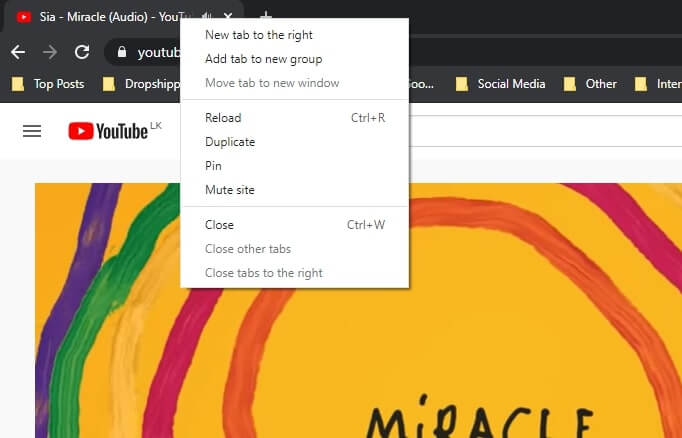
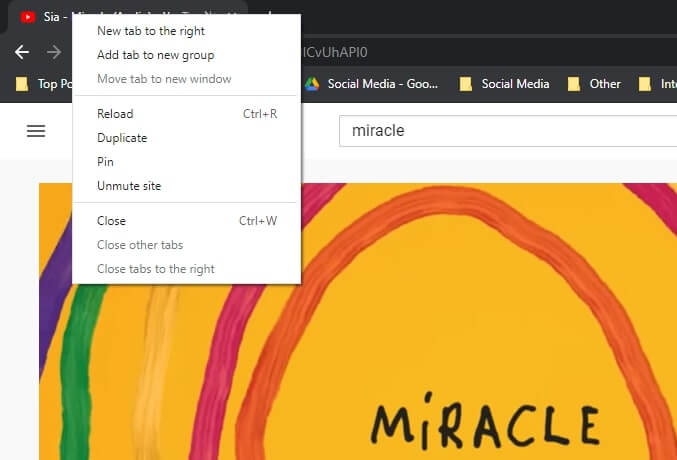
When you go to the Google Chrome browser, you can mute any website with few clicks. Every time you see the background music playing on the website, the small speaker icon would appear in the open tab’s navigation bar.
Speaker icon indicates the audio file is playing on the site. Now to mute the audio file on the open tab, right-click on the tab to see the speaker icon, and select the Mute site.
The Chrome browser will mute all the files available on the website. Also, to perform this task, you do not have to visit the particular tab. You can do it directly without accessing the tab from the currently open tab.
mute tab chrome
Why is the Chrome mute tab, not working?
Chrome has recently removed the Mute tab option, and instead of that, it has added the new feature called mute sites. The feature does a similar job, but it mute the entire site.
It means once the site is muted, it stays in the mute status until you unmute it. For example, the YouTube tab open in Chrome muted using the mute site setting; your YouTube video on all the tabs will remain muted.
If you want to mute only a single tab but not the entire site, you must install the mute tab extension to your Chrome browser.
It does a similar task as the mute site setting does in the browser. The only difference is the mute tab extension only mutes the particular tab, not the entire site.
So you can enjoy the Youtube video on the multiple tabs and mute only tab which you want to keep on hold and let another open tab with Youtube video play the audio.
Mute tab chrome extension is the best application that solves the most common problem of the web.
In the older versions of Google Chrome, the speaker icon appears whenever there is background audio on the site.
Users would have access to the instant mute option to mute the speaker icon in the browser itself. In the newer version of Google Chrome, the browser need a third-party application to use the same functionality.
mute tab chrome
Conclusion:
In the modern browser, the chrome mute tab is gone, and a new feature is added. The mute chrome tab is the lifesaver in some situations.
Knowing how to use the mute tab in Chrome would help you to take instant action whenever you see an audio file running in the background.
Have you ever wonder how you will use the control alt delete Mac? Many of you who recently shifted from the windows computer to Mac would have this most common question in mind. No worries.
We will help find the task manager program on the MAC computer, so when you need the program next time, you would be able to access it immediately.
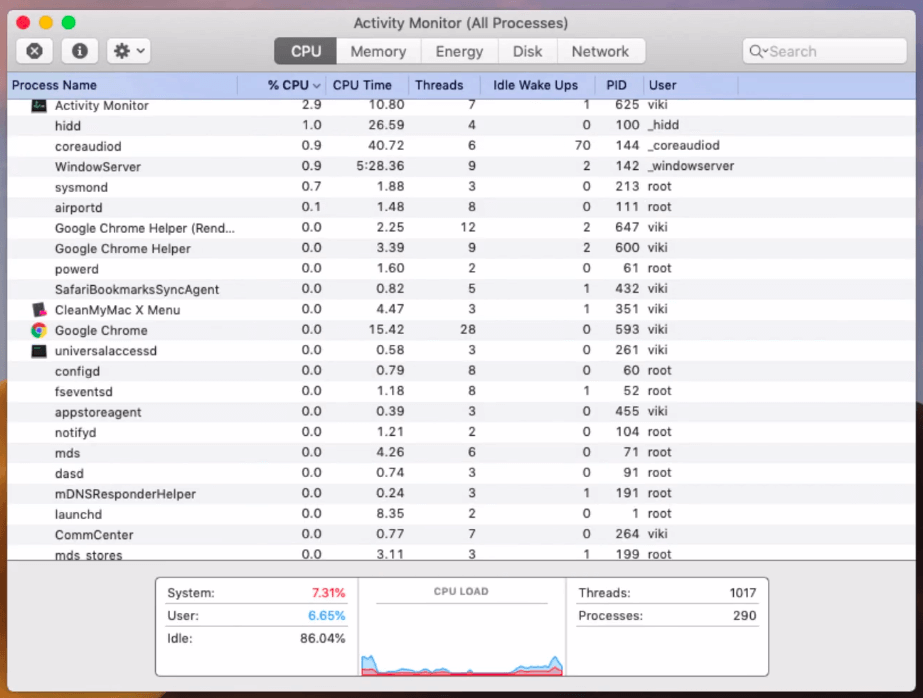
Use this shortcut key to open the Activity monitor window on your MAC computer.
Command (⌘)+ Option (Alt) + Esc
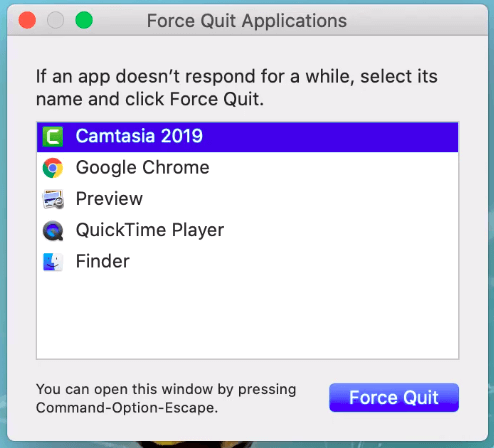
Once the activity monitor window is opened, select the program that you want to close and hit the force quit from the top navigation to instruct the MAC OS to close the program running in the background.
It will proceed ahead to your instruction and complete the program making the MAC OS run smoothly again as usual.
What is control alt delete Mac?
The control alt delete, the windows task manager’s shortcut, would not work on the Mac computer. The MAC OS works differently compared to the windows operating system. On the MAC OS, the task manager has named the Activity Monitor program.
You could be able to monitor all the background activity on the Mac computer using this program.
The might be different on the MAC computer, but the application does the same job as the windows task manager.
The Activity Monitor shows you all the active files in the window. You can check the files and force closed the file that you do not require.
Once the file is completed, the application running in the background will be shut down. You can now operate your computer without needing to worry about the freezing problem.
What is the benefit of the Mac control alt delete?
Mac controls alt delete program, which is known as Activity Monitor, is the program that gives the user power to close any frozen program on the MAC computer. There will be an occasion when the MAC software gets freeze.
You will not be able to run the application smoothly. In such a case, the MAC computer would not allow you to access any other file until you close the frozen application.
control alt delete mac
The only way to stop the application process is to force close it from the Activity Monitor.
How to do control alt delete on Mac?
The simplest way to run the control alt delete on Mac or the Activity monitor is using the shortcut keys.
Use Command (⌘) + Option (Alt) + Esc shortcut key to open the activity monitor on the Apple Mac Computer. Remember that you have to hold the keys one by one to activate the program.
Activity Monitor is a similar application that you find on a Windows computer. Most of the features in the Activity Monitor are the same.
However, the name of the action would be different. For example, the end process on the window is changed to Force Quit on the MAC computer.
You should know these terms to avoid any trouble while using the Activity Monitor on the Mac.
What is the purpose of the Activity Monitor program on the Mac Computer?
Have you ever experience a freezing problem on your MAC computer. The program that you were running might have a heavy process file that needs high-end memory support to run it smoothly.
When you try to multitask on the MAC computer, the memory of the MAC system exists.
All the background files would be aligned in the queue, waiting for the execution.
In such a case, the Mac system would stop some programs from Activity until the files required to run the program reach the execution gate.
Meanwhile, your screen gets to freeze, and you will not do any activity on the MAC computer.
The time it takes to clear the background file would take a few seconds or hours, depending on the file’s size.
In such a situation, you only have two options, either shut the Mac computer and restart it to clear the background file or use the Activity Monitor to force quit the program that caused the problem.
The Force quit function moves the file from running, and your system goes back to normal.
The program overrides the application and clears the path for the other program to proceed to execution.
After completing the process, you will be able to run any application on the system without needing to restart your Mac computer. The activity monitoring programs save time.
Things to remember when you are using the Force Quit program on the Mac
The force quit program closes the selected file and makes room for the other files in the queue to run smoothly.
The one thing that you need to remember is the force quit program shut down all the selected program’s background processes.
It means all the files running on your computer will be closed. So any file that is not saved will be deleted. For example, if you try to force quit the excel file that is frozen.
Any data which was not saved before the freezing issue would be lost. You will not be able to recover the information again.
If you are willing to protect the data before closing it, wait for the queue to clear and let your computer settings back to normal.
This is the only way you can save your data from loss. However, it may take several minutes for the MAC OS to go back to the normal condition.
If you have an autosave function enabled on the program, that may come to the rescue in such an unexpected event. Browser windows used to force quit can be restored quickly.
You can use the restore close window option to go back to the same window again. Therefore, it is advisable that use the force to quit only as a last resort.
When to use alt control delete Mac?
The alt control deletes Mac, or the activity monitor can be used in various circumstances. Here are some of the reasons why you may have to use the alt control delete Mac.
1) Program freeze on the MAC computer, which not allowing you to access any other file.
2) Use an activity monitor to keep an eye on the background process. Sometimes the background application that is not in use consumes a high amount of memories.
Closing such a program would clear the path for the other program, and your computer would run smoothly.
3) Delete virus running in the background. Activity monitor also allows you to check the files that are running in the background.
Check for the file that does not look like the system file. The virus running in the environment may collect data from the open window and pass through the server to the host.
A data breach would lead to your data. In the worst case, the third party application would have your details, such as user name and password.
4) Clear the space by using the force quit instruction. If the memory space has reached its maximum capacity, your MAC computer will start slowing down.
You will be able to experience the slow output of the entered data or the file that generally opens instantly, taking too much time to load.
The reason would be the slow memory process. You might have to close some programs to clear some space.
Conclusion:
Use the Activity Monitor program on the Mac frequently to keep your PC in good condition. You will be able to do complete more task when your computer process the data faster.
And you can learn more on keyboard shortcuts on mac watching the following video.
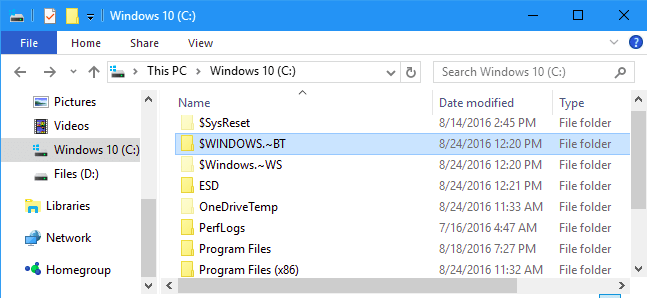
The latest version of Windows 10 comes with new files and folders. These files are part of the C folder and consume a fair amount of space. You can read more about this in our article on How much space does windows 10 take?
While analyzing the windows files’ data, you may encounter various files consuming a fair amount of storage space. You may wonder why these files are drinking beautiful memories. Is it safe to delete them? Would you delete the $windows. bt?
$windows. bt
Does the bt file impact the overall performance of the windows operating system?
The $windows~Bt folder is part of the windows ten operating system. It performs the Windows ten software upgrade process when there are new changes available to the software. You may see similar files in windows 7, 8, and 10.
Generally, the $windows~bt files are kept hidden in default mode. You may have to change the files’ appearance from hidden to show the files’ entire library.
$windows~bt windows 10
On the Windows 10 operating system, the $windows~bt folder contains the previously installed windows files. The files’ purpose is to downgrade the file to the previous version if you encounter an anomaly in the system.
Earlier, the windows software was used to save the files in Windows. The old folder which now replaces by the $windows bt folder. In some cases, you may see both the folders Windows. Old and $windows bt in the C drive of your computer.
$windows. bt folder on windows 10
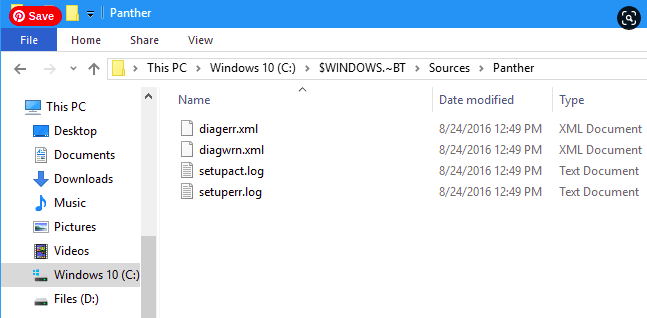
The $windows~bt file serve multiple purposes. The folder will have log files of the past installation and activities performed during the installation process when you download and run the media creation tool. In the background, the $windows bt file is created in the folder.
The log files will have the steps you have followed while installation the application. In the other folder, name $WINDOWS.~WS, you will find the windows setup files.
Usually, windows automatically delete the files and clean the folder for you within ten days of installation or thirty days if the computer hasn’t upgraded for a very long period. You can delete this folder manually if windows have not performed the process yet.
Can I delete $windows~bt?
Technically you can delete the $windows~Bt file from the folder as you delete other files on your computer. Before you decide to delete the file, you should know that some benefits come with the file you cannot use after being permanently deleted.
The primary function of the windows~bt is to change the current version of the windows. It allows you to downgrade windows 10 to the previous version.
$windows. bt folder
There will be occasions when the application or the software installed on your computer might not support the latest version of Windows 10. In the corporate, no supporting windows would result in a significant loss for the company.
Their employee might not perform their task on the software, leading to chaos in the organization. In such circumstances, downgrading windows 10 to a lower compatible version would solve the problem.
Hence, the file plays a crucial role in managing the operating system on your computer. You can quickly shift the performance to the older version and start using the computer as usual.
The flexibility of moving from the upper version to the lower version will be removed once you delete the $windows~ bt file from your computer. You cannot go back to the lower performance in the future.
Moreover, the windows ten operating system comes with the recovery function. The function is meant for the people who mistakenly delete some files or make some changes to the windows file and experience the error in their PC.
The one way of solving this problem is to install the new version of windows, but in that case, your existing files will be replaced with a new one, and all your data will be deleted.
Delete $windows. bt
How to recovery $windows~ bt?
Another option to get back to normal is to use the Recovery option. The recovery option saves the copy of the previous file in the backup.
When you instruct the computer to recover the file to the last date or the month of the backup file, the system will automatically detect the file and uploads the backup file to the live function. Your data is preserved in the process, and the windows error will be obliterated.
The recovery function is using the files stored in the $windows~bt folder. Once you delete the $windows~bt file from your computer, you will notice the Setting section to find the Recovery option removed. You no longer have the feature of recovering your data using the backup file.
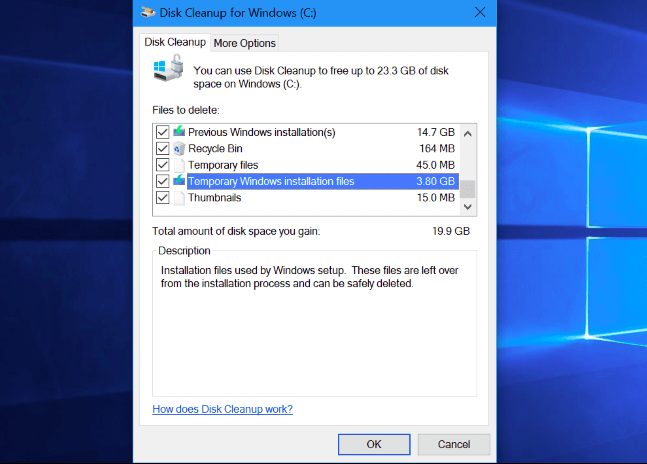
Remember that windows 10 automatically delete the windows.~bt file safely after it completes the ten days. If you want to clean unwanted windows files, you should use the Disk Cleanup tool instead of deleting them manually.
The disk cleanup operation will detect and analyze the windows file and choose the unwanted files for deleting it from the system. It will not harm your computer in any way, and all the files will be removed safely without messing with your operating system.
$windows. bt
In conclusion:
The $windows~bt file may look suspicious when you see it the first time in your program file folder. The file is there to serve some purpose. Windows check the file regularly for any changes. It monitors all the files and removes any alien files from the computer.
Also, the windows defender software is powerful enough to protect your computer. You do not need to manually monitor the program files for protecting your computer from the virus. The latest version of windows 10 is highly secure.
The real-time monitoring system gives windows 10 Edge over the other operating system. When you run Windows 10 on your computer, it checks your operation, the application you installed and regularly changes your computer.
When it detects any issues or the folder in the program file, the windows defender software is activated.
The unsafe file is moved to the trash folder, and a notification is sent to the user. You can check the folder manually, and if you find it unknown, you can instruct the windows defender to remove it safely without harming the other operation.
Overall, Windows 10 is a safe operating system, so you do not have to worry about your computer’s $windows~bt folder.
The storage requirement of the windows 10 computer depends on various factors. Sometimes the windows require to take the backup, which gets added to the top of the standard computing file. In that case, your computer system would take much more space than the PC that comes with windows installed.
how much space does windows 10 take
How much space does windows 10 pro take?
This is the common question that arises when you are concerned about your computer device’s storage capacity. The program file consumes most of the storage, and it sometimes reaches the point where you could not store much data on the PC.
There are several reasons why Windows 10 applications require more storage space. This guide will understand why and how much data storage space does the windows computer needed to run the operation smoothly.
Before the Windows 10 on your computer, check for the storage capacity. It makes sense to analyze the storage before installation and after installation to know about the Windows operating system’s storage space.
You should have minimum storage space allocated to the windows files; else, the system would not start, and your computer screen would get stuck to the black screen.
how much space does windows 10 take
How much does Windows 10 take up on your disk space?
In the launch period, the windows 10 program used to take less space to install. Compared to the windows 8 version, windows 10 was a lightweight application.
The new Windows 10 version is used to consume 16 GB of storage on 32-bit and 20 GB for 64-bit systems.
The windows 10 version was efficient compared to the current version. The size has increased over the period as windows developers started adding more features.
Many updates have rolled out by windows 10. Every new part got its space requirement, piled up on the computing file’s core, making it to a more heavy application.
Since its launch, many new features are introduced to Windows 10.
how much space does windows 10 take
Today, if you want to install the windows 10 application on your computer, you must have a minimum of 32 GB free storage space on your hard drive for 32-bit and 64-bit computer architecture.
How much space does windows 10 take on an SSD?
Your windows 10 would take a minimum of 30 GB of space, which you need to keep free. Additionally, the old windows data backup file would add more 20 to 30 GB of space on top of the core files.
Hibernation and fast startup are additional programs that run with windows 10 that will more 5 GB space. The temporary file takes around 5 GB of space. If we plus all these consume storage space, it will add up to 80GB of hard drive space.
Moreover, some additional apps you would require to install should be added later in the windows that may consume 10 GB of storage space.
how much space does windows 10 take
Now the final storage would reach 90 GB. If you want to install windows 10 on your computer, the minimum storage need would be 90 GB for the basic version. Note that the pro version may have additional files that will take more than 90 GB of space.
A standard computer running on the 128 SSD would get approx 120 GB of space to use. After installing Windows 10 on your computer, the 30 GB storage space would be left in your device.
In the remaining area, you might not install additional software or keep the downloaded files.
There will always be a need for more space in SSD drive computer devices.
SSD drive might help you run the application faster, but if you are concerned about the storage, then 128 GB would not be sufficient, and you might have to rely on the cloud storage services to save essential files.
How much space does windows 10 take on mac?
Windows 10 comes with all the essential files and features. If you are trying to install Windows 10 on your Mac computer, you may require a minimum of 40 GB of free space.
Mac device would not allow running the Windows application until it finds the necessary free space on your computer. It will halt the process initially and alert you with the notification message saying you need more space to install the OS.
how much space does windows 10 take
How much space does windows 10 pro take up?
Windows 10 Pro version requires a minimum of 15 GB of storage space to run the OS; however, the storage requirement may go up as other files will come with the Windows application.
A new supported app would be downloaded from the web, and essential changes will be made, which will add up to more space.
Remember that 15 storage spaces require when you install windows first time on the computer. If you upgrade the windows from the basic to pro version, then the windows file would need a backup of the existing file.
The backup storage will be added on top of it. Windows is known for saving the cache files in the background that enables the OS to speed up individual files.
Over the period, the cache files gain more weight, and your storage space would be consumed. You should keep more space aside to avoid slow down the computer in the future.
how much space does windows 10 take
Final Verdict:
Windows 10 version is consistently upgrading. The OS developer is trying to minimize the size of the core file to make more space available for other tasks.
It is predicted that in the future versions of windows, we may see lightweight windows files that do a better job executing the task and enhancing speed.
It is better to have sufficient storage space on your hard drive. Even if you are using the SSD drive, ensure that you do not install unwanted software or games to occupy the space.
Providing sufficient operating space to the windows 10 program enables it to run the application smoothly.


![[SOLVED] Firefox Not Responding – 6 Easy Steps to Try in 2021](https://techfromzero.com/wp-content/uploads/2021/04/pexels-cottonbro-5077048-1-1-768x512.jpg "[SOLVED] Firefox Not Responding – 6 Easy Steps to Try in 2021")